Overview
What is FrameFlow?
FrameFlow is a macOS app that turns a fast-moving shoot into a shared, live contact sheet. You ingest straight off your cards, cull and colour-tag frames, write captions, hand selects to Photoshop, and deliver to your wire or DAM — all from one window.
Its real power shows with a team: several editors point at one shared library — together in the same room or spread across the internet — and every rank, colour label, caption, edit, and send shows up on everyone’s screen in real time. One person can shoot while another culls and a third captions and delivers — no exporting folders back and forth.
Audience
Who is it for?
Event and sports photographers who need to get edited, captioned images out the door during the event — solo shooters who want one tight pipeline, and crews of photographers and editors who need to work the same take together. If you’re a teammate joining someone else’s session, skip to Working as a team.
Requirements
What do I need to run it?
- macOS 13 (Ventura) or later, Apple Silicon or Intel.
- Adobe Photoshop — only if you want the in-app edit round-trip (Camera Raw / Photoshop). Everything else works without it.
- A network connection if you want to collaborate live — a local network (same Wi-Fi or wired LAN) for editors in the same building, or an internet-reachable host for remote editors (see below).
- Nothing else to install — image-metadata tooling is bundled inside the app.
Installation
How do I install it?
Open the .dmg and drag FrameFlow into your Applications folder.
Signed & notarized. FrameFlow ships signed with a Developer ID and notarized by Apple, so it opens cleanly on a current Mac. If you’re on an older system and Gatekeeper hesitates, right-click the app → Open → Open, and confirm once.
If macOS still blocks it, open Terminal and run:
xattr -dr com.apple.quarantine /Applications/FrameFlow.appLicensing
How does activation work?
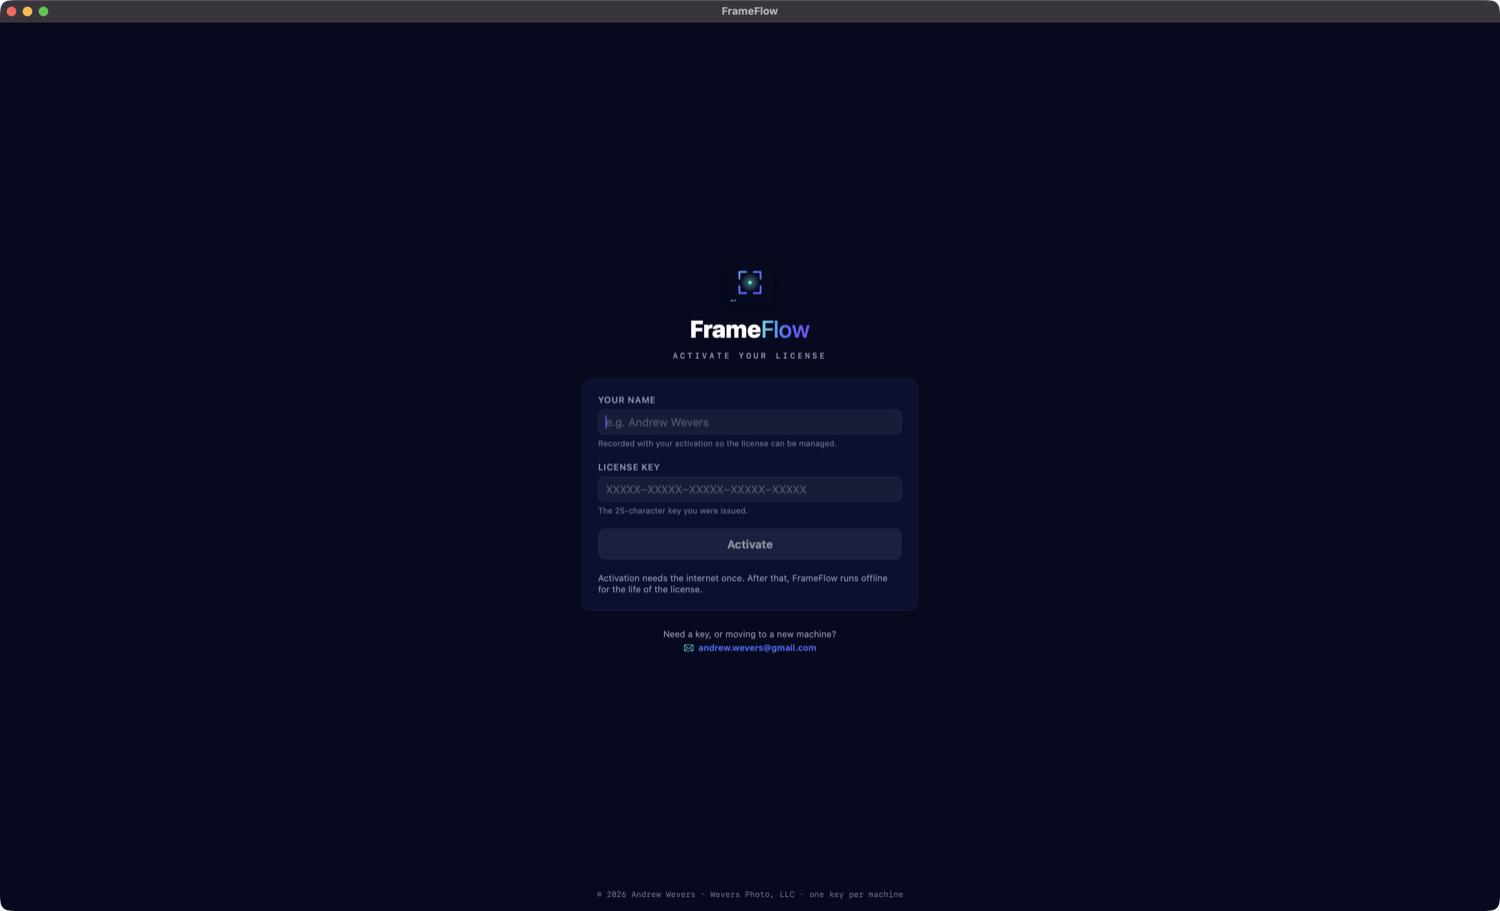
On first launch FrameFlow asks for your name and license key (plus an optional Organization — handy when one desk runs several licenses). It activates online once, then verifies a signed license offline forever after — so you’re covered shooting from a stadium with flaky Wi-Fi. After that the app opens straight to your library, and the account icon (top-right) shows your license and days remaining.
What are license tiers?
Licenses come in three tiers. A standard license is the full everyday FrameFlow — ingest, cull, caption, edit, deliver, collaborate. Editor and admin licenses unlock the power-desk features on top: Caption Rewrite, the Live Log, Relay, speed-to-market timing, permanent delete and library reset across a session, and managing the host’s FTP destinations from a joined Mac. If a feature described on this page is missing from your copy, it’s tier-gated — your license badge (top-right) shows which tier you hold.
What does a license cover, and how do I move to a new Mac?
One key activates FrameFlow on one machine. Moving to a new Mac? Open the account icon → Deactivate this Mac, then activate with the same key on the new one. If a machine is lost or you’re stuck, email support and we’ll release the key for you.
The interface
A quick tour of the window
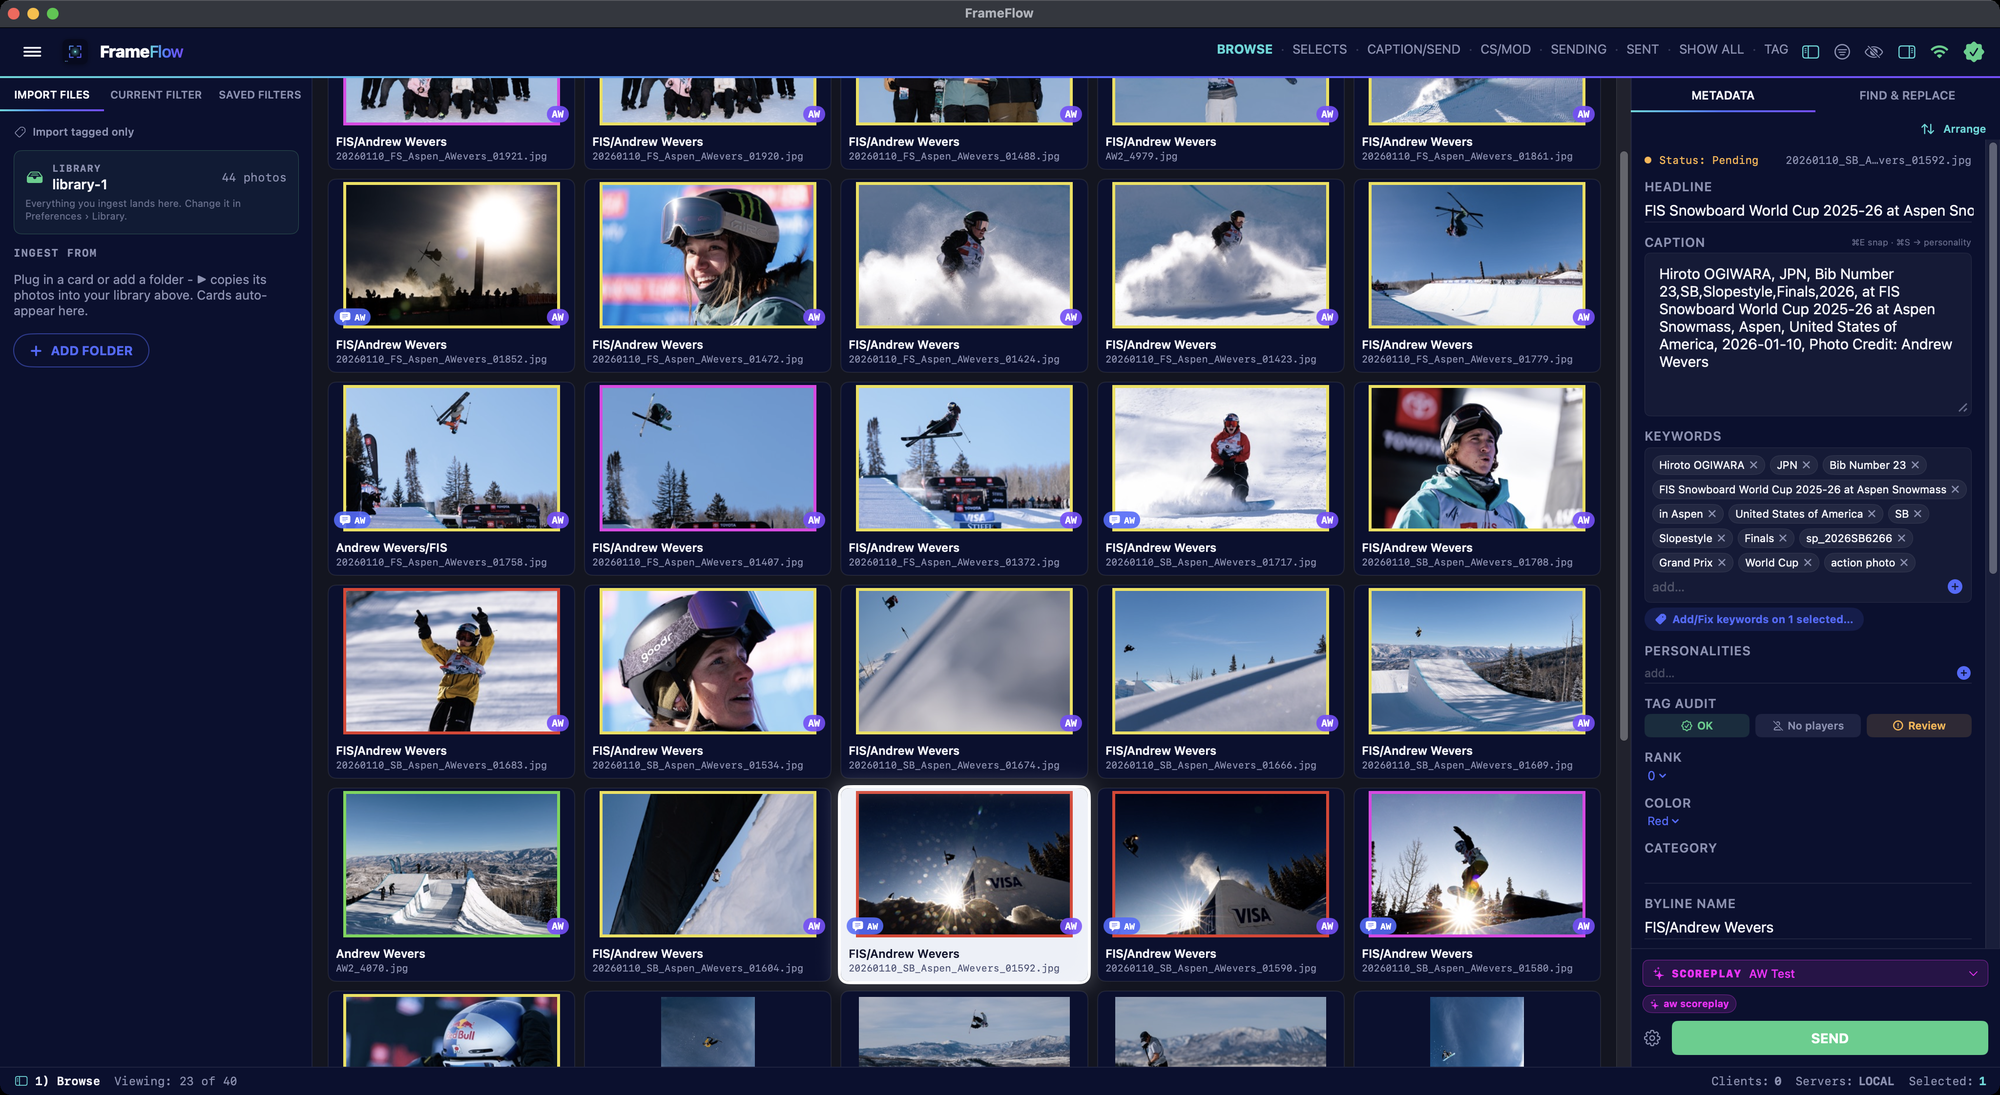
FrameFlow is one window with three columns and a row of tabs on top:
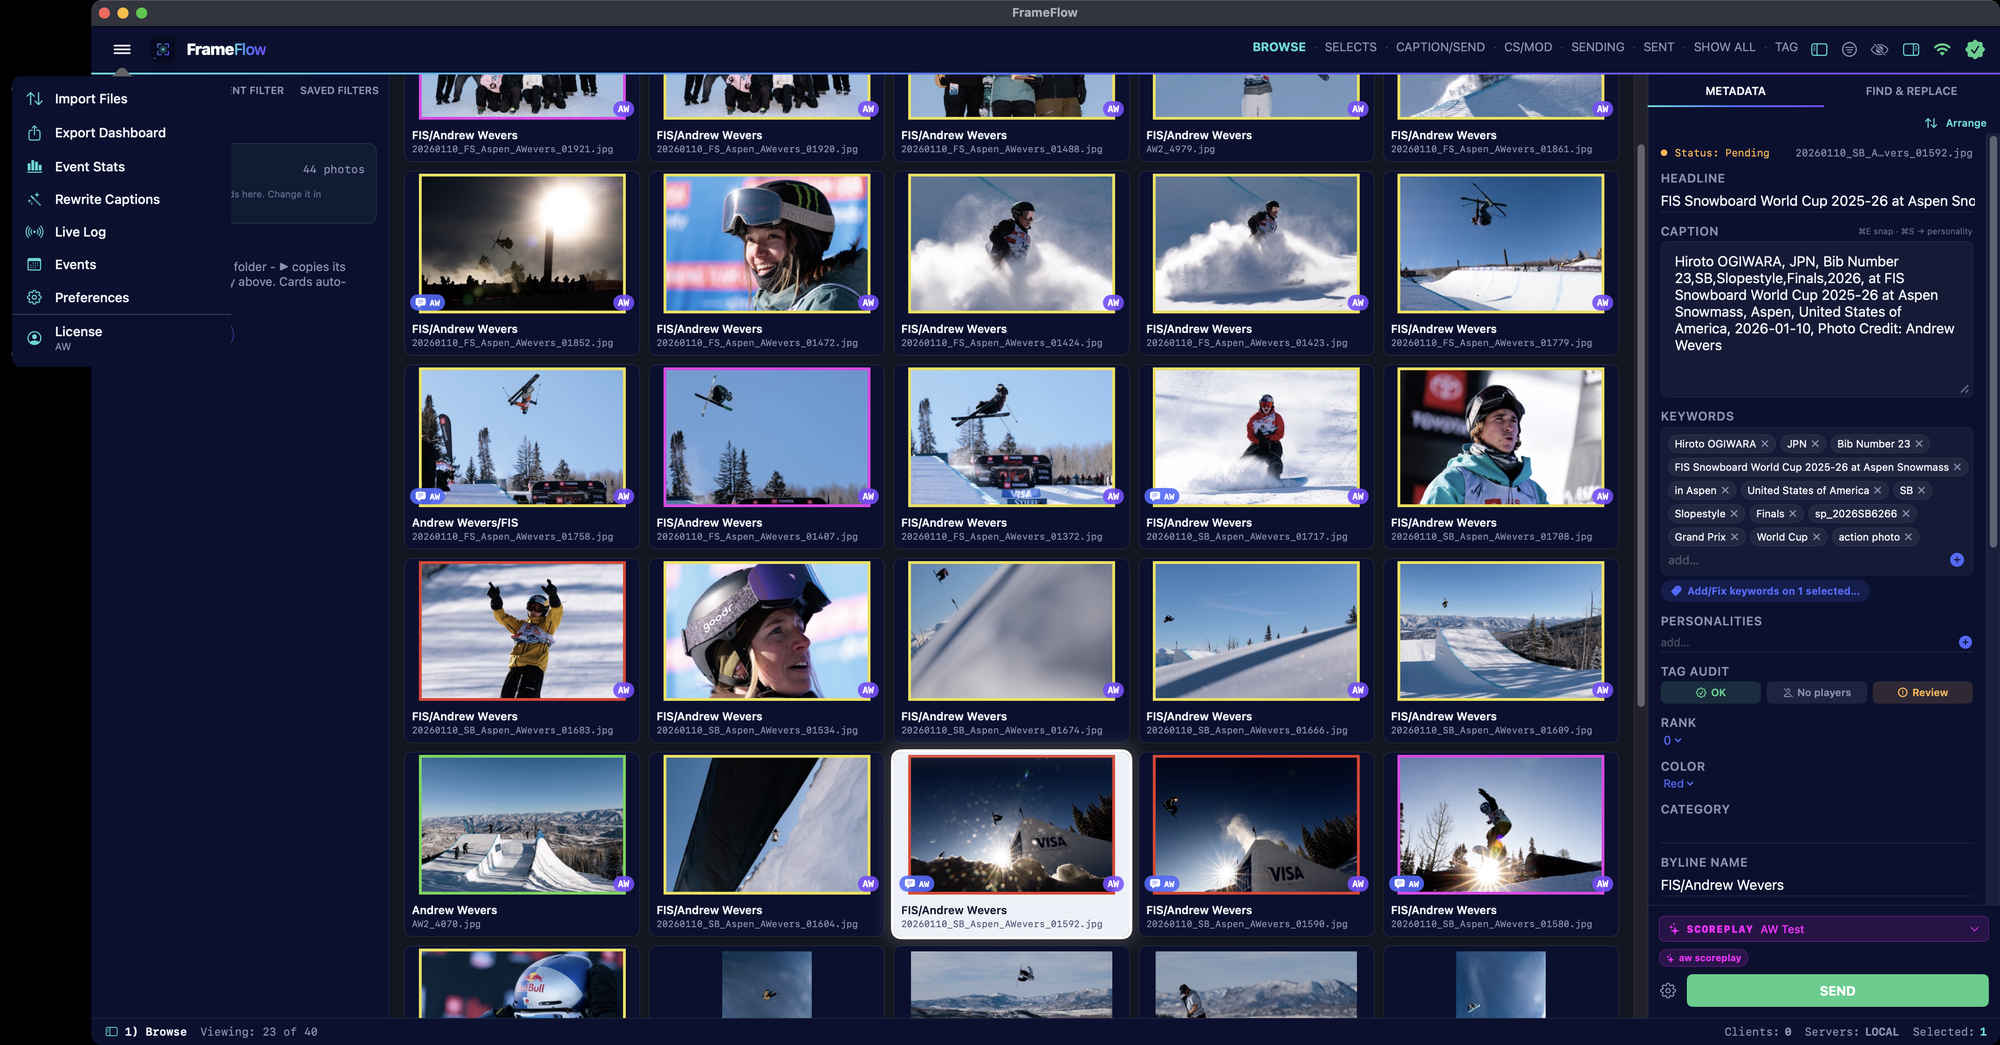
- Top bar — the hamburger menu (far left) opens everything (Import Files, Export Dashboard, Event Stats, Rewrite Captions, Live Log, Events, Preferences, License); the workflow tabs (Browse · Selects · Caption/Send · Sending · Sent) run across the top; the icons top-right toggle the panels and show your network/account status.
- Left panel — three tabs: Import Files, Current Filter, and Saved Filters. Toggle it with ⌘J.
- Centre — the live contact sheet. Colour borders are your tags.
- Right panel — the Metadata / caption panel for the selected frame. Toggle it with ⌘K.
The workflow
How is the work organized?
The tabs across the top walk a frame from card to client:
- Browse — everything you’ve ingested.
- Selects — frames you’ve colour-tagged as keepers, not yet edited.
- Caption / Send — edited frames, back from Photoshop, waiting on a caption and delivery.
- Sending — in the delivery queue.
- Sent — delivered.
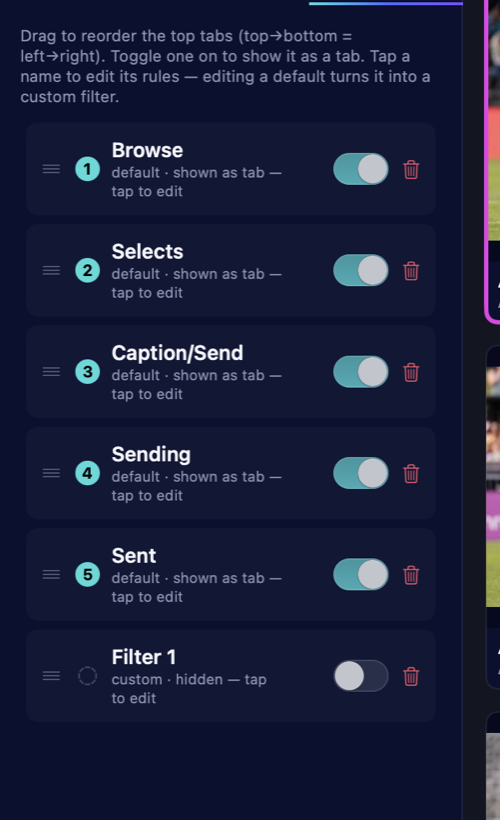
You can reorder these tabs, hide ones you don’t use, edit what they show, and add your own saved filters as tabs — see Filters & tabs.
Ingesting
How do I get images in?
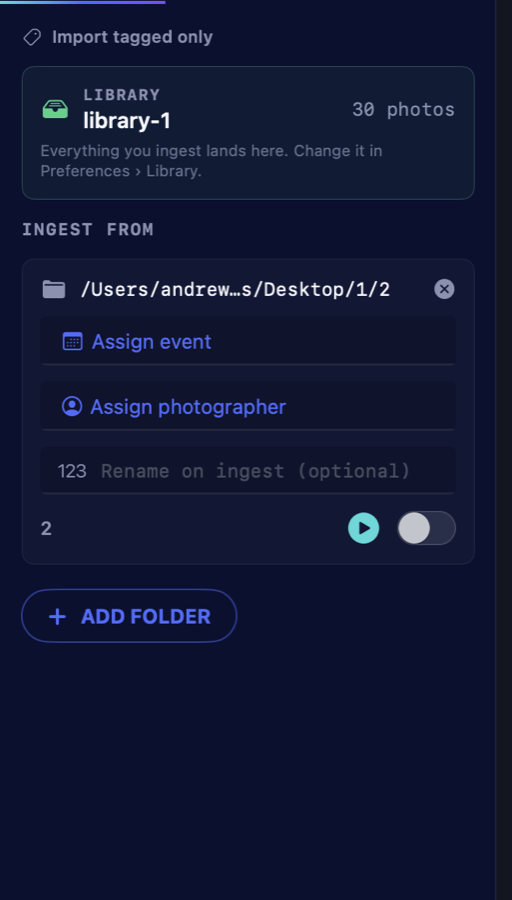
Plug in a card and FrameFlow detects it, pops the Import Files panel, and adds the card as a source — but it won’t start copying until you press ▶, so you stay in control. You can also Add Folder to ingest from any folder, or flip the toggle to live-watch a source so new frames copy in automatically.
Everything you ingest copies into one library (your contact sheet). On the way in you can apply a rename pattern, an Event, and a Photographer, and re-ingesting the same card only pulls new frames.
What if files are still uploading or a transfer was cut off?
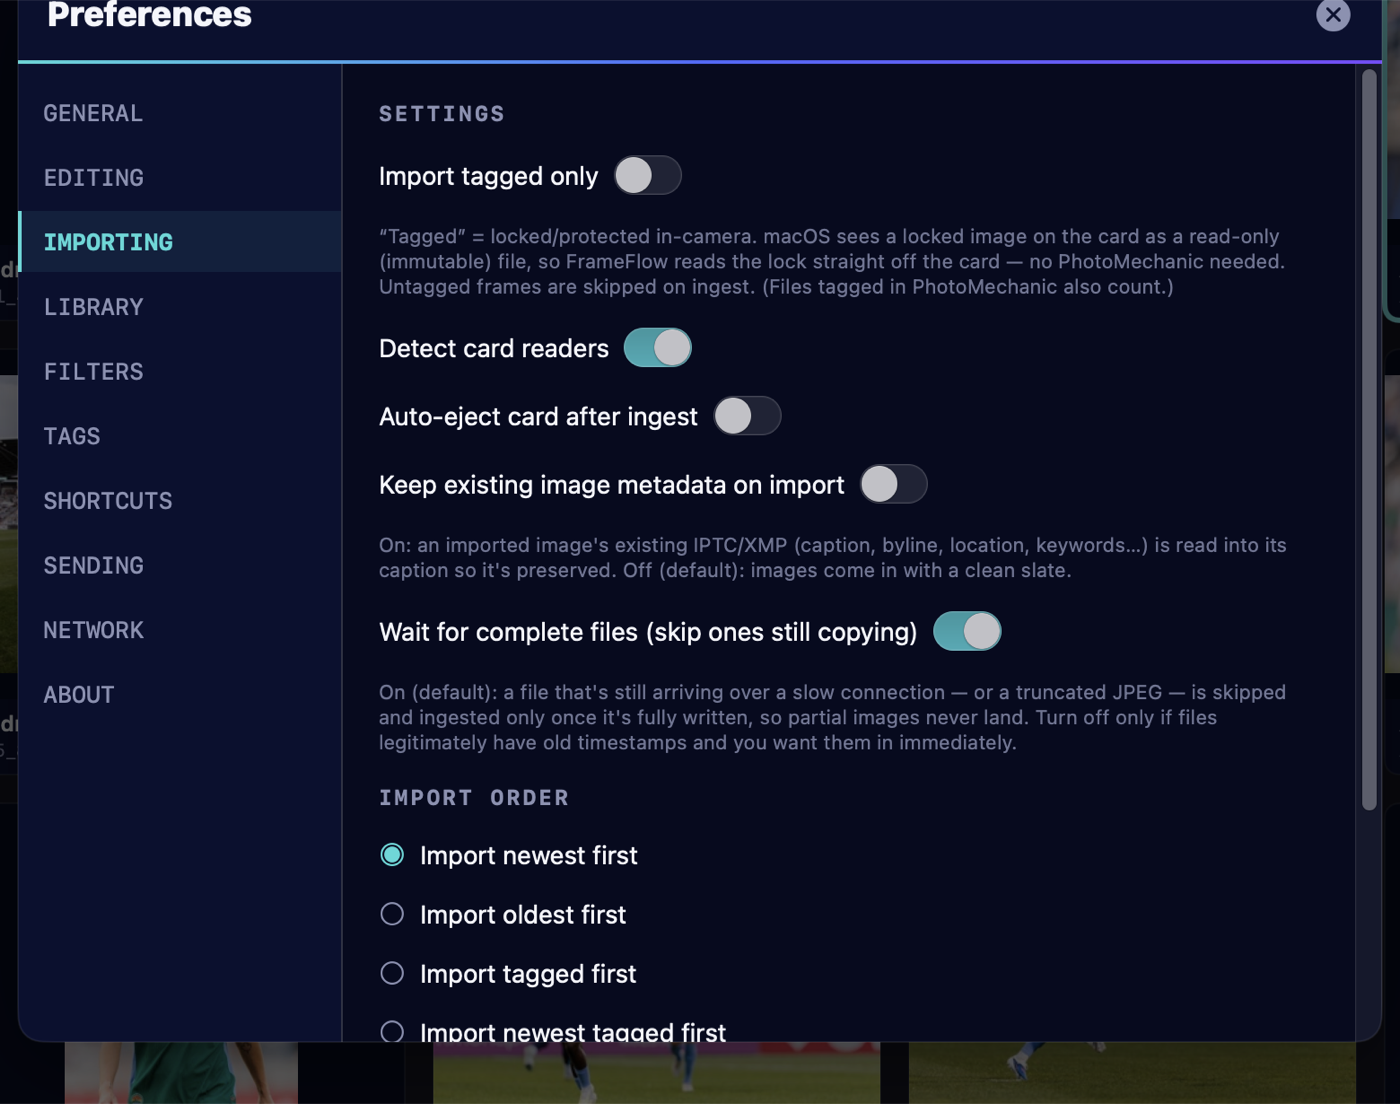
FrameFlow won’t ingest a half-written file. With Wait for complete files on (the default, in Preferences → Importing), a frame that’s still arriving over a slow connection — or a truncated JPEG from a dropped transfer — is skipped until it’s fully written, then pulled in on its own. So a partial image never lands, and the complete copy that follows still comes in. Live-watched sources re-check automatically.
Does it keep the metadata that’s already on my files?
Turn on Keep existing image metadata on import (Preferences → Importing) and an incoming file’s existing IPTC/XMP — caption, byline, location, keywords — is read into its caption and preserved. Off by default, so frames come in with a clean slate.
Can it eject the card when it’s done?
Yes — turn on Auto-eject card after ingest in Preferences → Importing, and the card ejects once a manual ingest finishes.
How do I clean up a watch folder at the end of the shoot?
Each ingest source has a trash button that moves the files you’ve already ingested to the Trash — the library keeps its copies, the drop folder goes back to empty for the next event. A source can also relay everything it ingests onward to your wire the moment it lands.
Tagged frames
What does “Import tagged only” / “Tagged” mean?
“Tagged” means the frame was locked (protected) in-camera. When you lock a shot on the camera, macOS sees it on the card as a read-only file — FrameFlow reads that straight off the card, so you can import only your locked keepers and skip everything else.
Turn it on with Import tagged only (Preferences → Importing, or the link at the top of the Import panel). You can also filter the contact sheet by Tagged at any time.
Good to know: the lock travels with the file only when you ingest directly from the card. If you copy a card to a regular folder first (in Finder), the lock is stripped. Frames tagged in PhotoMechanic also count as tagged.
Culling & tagging
How do I cull and tag frames?
Click a frame (or ⌘/⇧-click to multi-select) and tag it:
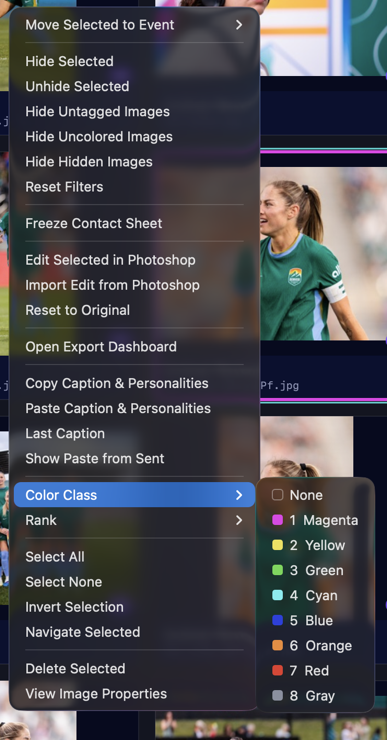
- 1–8 set a colour class · 0 clears it · the colour becomes the frame’s border.
- Space sets a rank · H hides a frame.
- ← → move between frames; ⌘A / ⌘D select all / none.
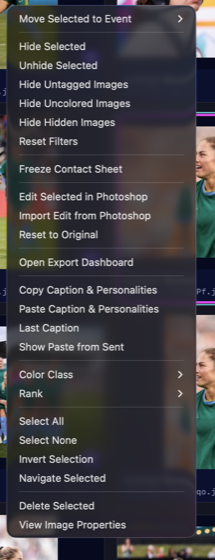
Right-click any frame for the full menu — move to an event, hide/unhide, edit in Photoshop, copy/paste captions, set colour or rank, open the Export Dashboard, view image properties, and more. The colour classes use PhotoMechanic-style names (Selects, Superior, Typical…).
Freeze mode
Lots of photographers are uploading — how do I cull one batch at a time?
Press ⌘F (or right-click → Freeze Contact Sheet) to freeze the grid on the current set of frames. New images keep flowing into the library in the background — they’re just held out of the grid until you unfreeze — so the sheet doesn’t reshuffle under you while you work. A banner across the top shows how many new frames are waiting.

A typical cull pass: Freeze → colour your keepers → Hide Uncolored (⌘⇧U, hides everything without a colour) → Unfreeze. The frames that arrived during the freeze are never hidden by that step — after you unfreeze, you’ll see your keepers plus everything new, ready for the next batch.
Events & photographers
How do I set up an event and its photographers?
Open Events from the menu. An Event is a reusable template for a shoot — name, headline, a caption template (with a <<enter caption here>> placeholder), city, venue, state, source and category. Build it once, then apply it to a whole selection so every frame starts with the right location and boilerplate.
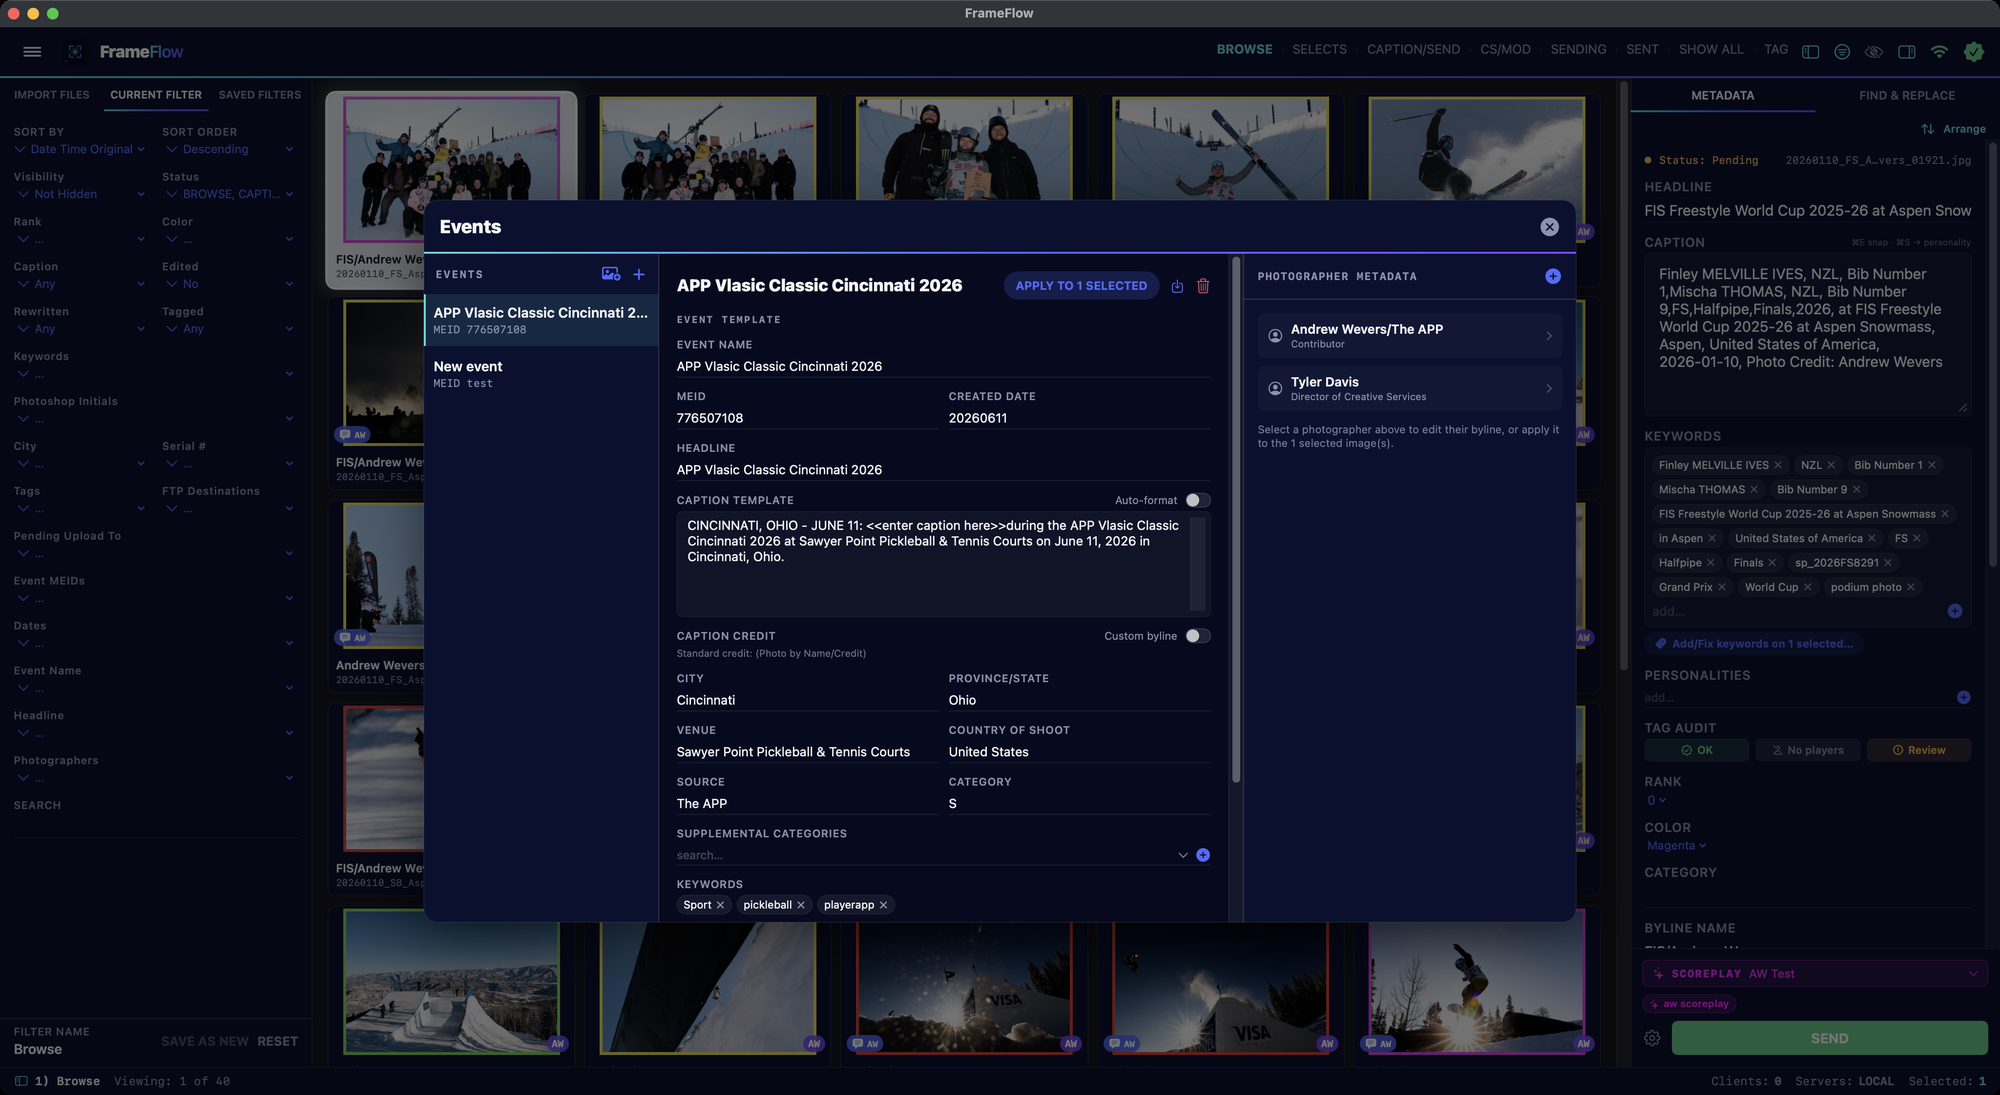
The Photographer Metadata column lists everyone shooting the event with their byline, byline title, credit line and copyright; selecting a photographer fills the byline/credit on the chosen frames and appends a “(Photo by …)” credit to the caption. Flip on Custom byline to define your own credit format with {name} and {credit} tokens instead of the standard line — per event, so a league’s house style is set once.
You can also import an image or an exported .XMP metadata template (from Photo Mechanic or FrameFlow itself) — the event reads its embedded metadata and pre-fills the headline, city, venue, IDs and detected bylines for you.
Captions & metadata
How do I caption images?
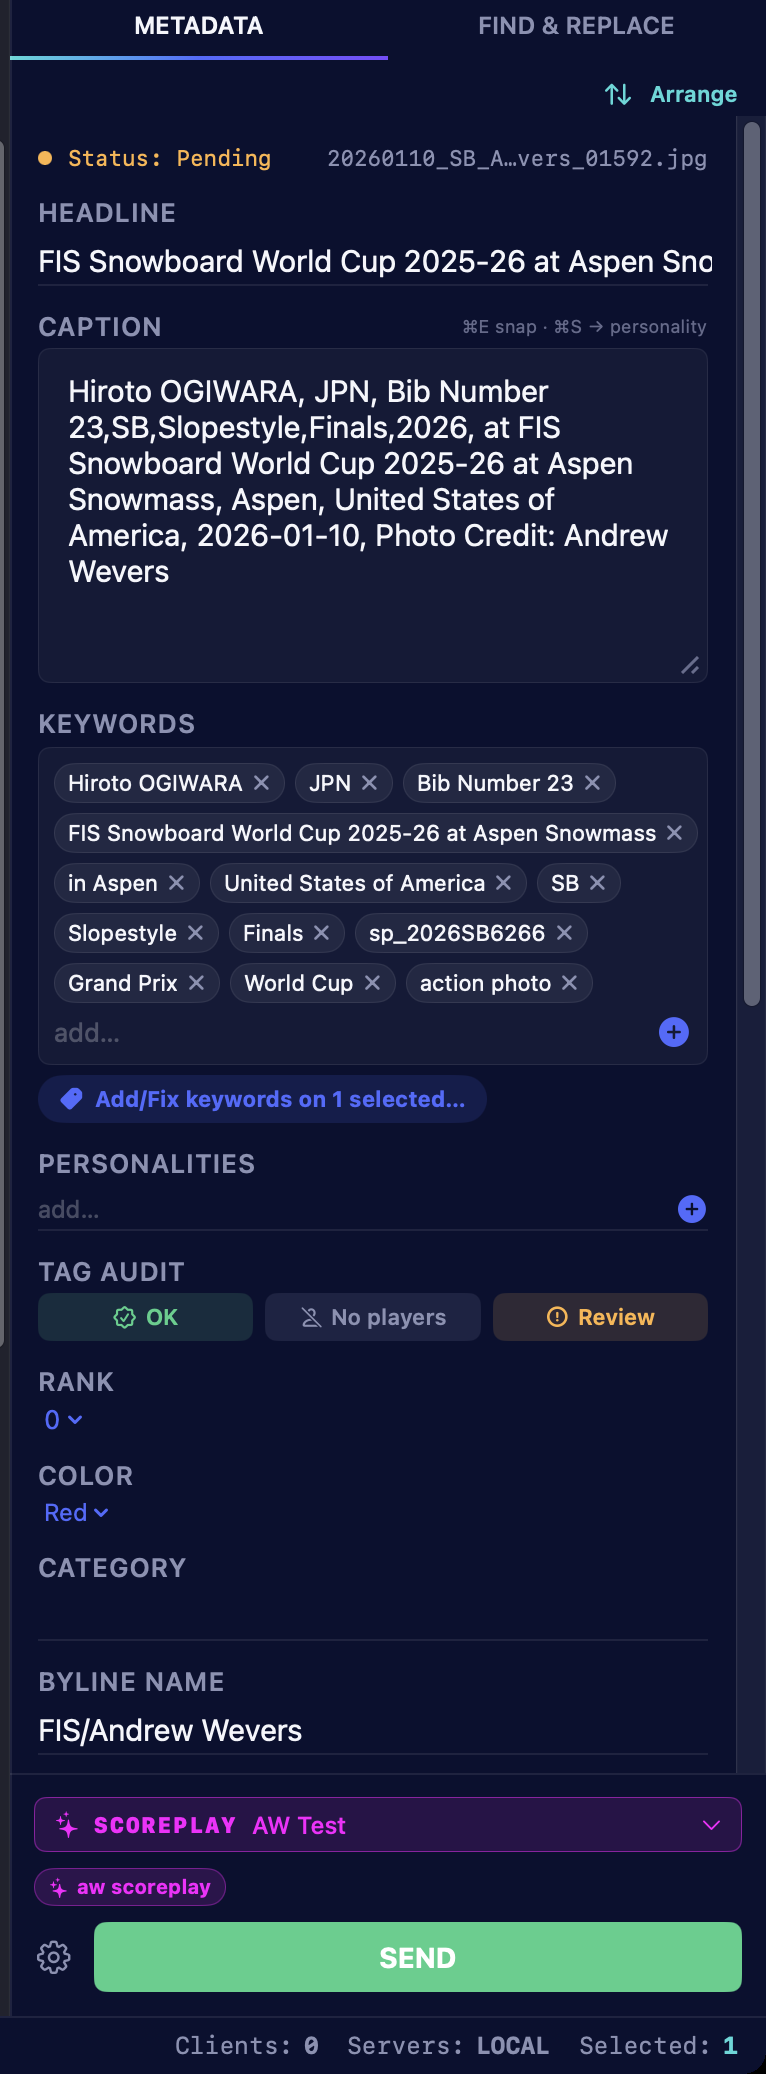
The Metadata panel on the right holds the full IPTC set — headline, caption, byline, credit, location, keywords, people, special instructions, and more. ⌘E jumps to the caption placeholder so you can start typing instantly. Apply an Event or Photographer to fill the boilerplate, then type the specific caption.
Can I rearrange the metadata fields?
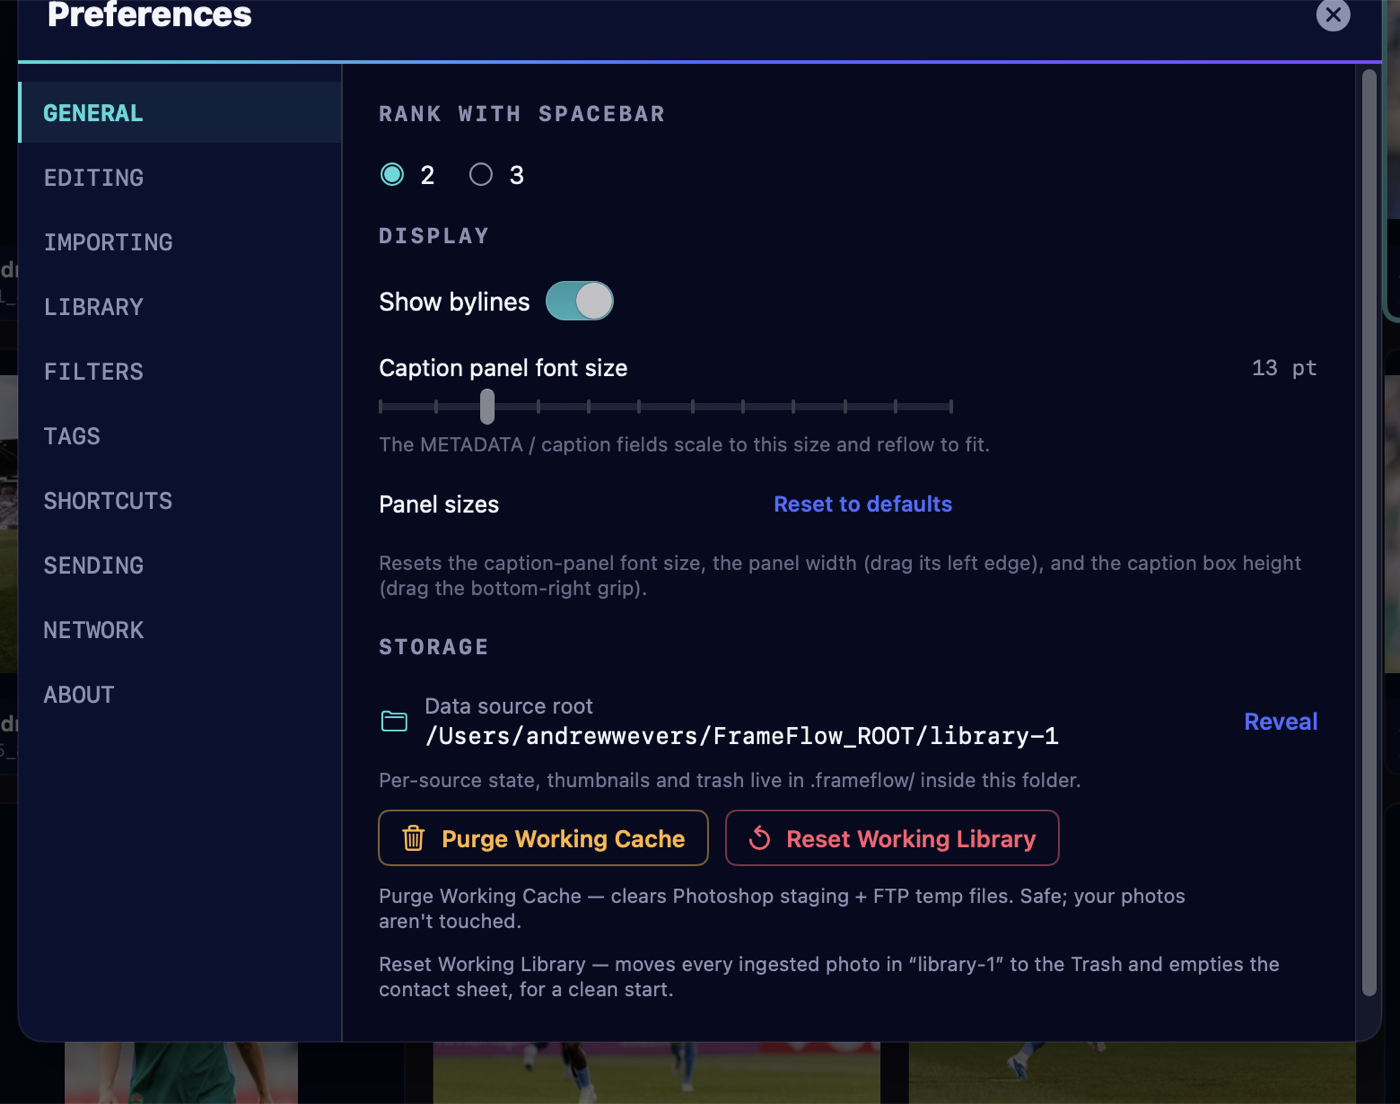
Yes. Click Arrange at the top of the Metadata panel and drag the fields into the order you work — Keywords up top, byline down low, whatever fits your flow. Your order is saved, and the eye toggle hides the fields you never use. (You can also resize the panel’s width and the caption box, and scale its text in Preferences → General.)
Can I edit metadata on a whole batch at once?
Yes. With two or more frames selected, the panel’s top row shows Apply to N… — it opens a picker that reads the current frame’s saved metadata and lets you tick exactly which fields to copy to every selected frame: headline, caption, category, special instructions, venue, IDs, keywords, personalities and more, each with a preview of what will copy. Byline name and title, credit line and copyright sit behind their own explicit toggle so a photographer’s credit is never overwritten by accident. Only the fields you tick move — everything else on every frame stays exactly as it was.
Can I add keywords to frames I already delivered?
Yes — select them on the Sent tab and use Add/Fix keywords on N selected…. FrameFlow pushes the keywords onto the already-delivered copies as real tags in your Scoreplay collection — creating any that don’t exist yet — with a progress bar and a per-frame report of anything that failed. Retroactive keywording without re-sending a single image.
Does the metadata travel with delivered & exported files?
Yes. When you send or export, FrameFlow writes the IPTC/XMP fields into the delivered/exported copy of the image — your originals on disk are left untouched.
Caption Rewrite
What is Caption Rewrite?
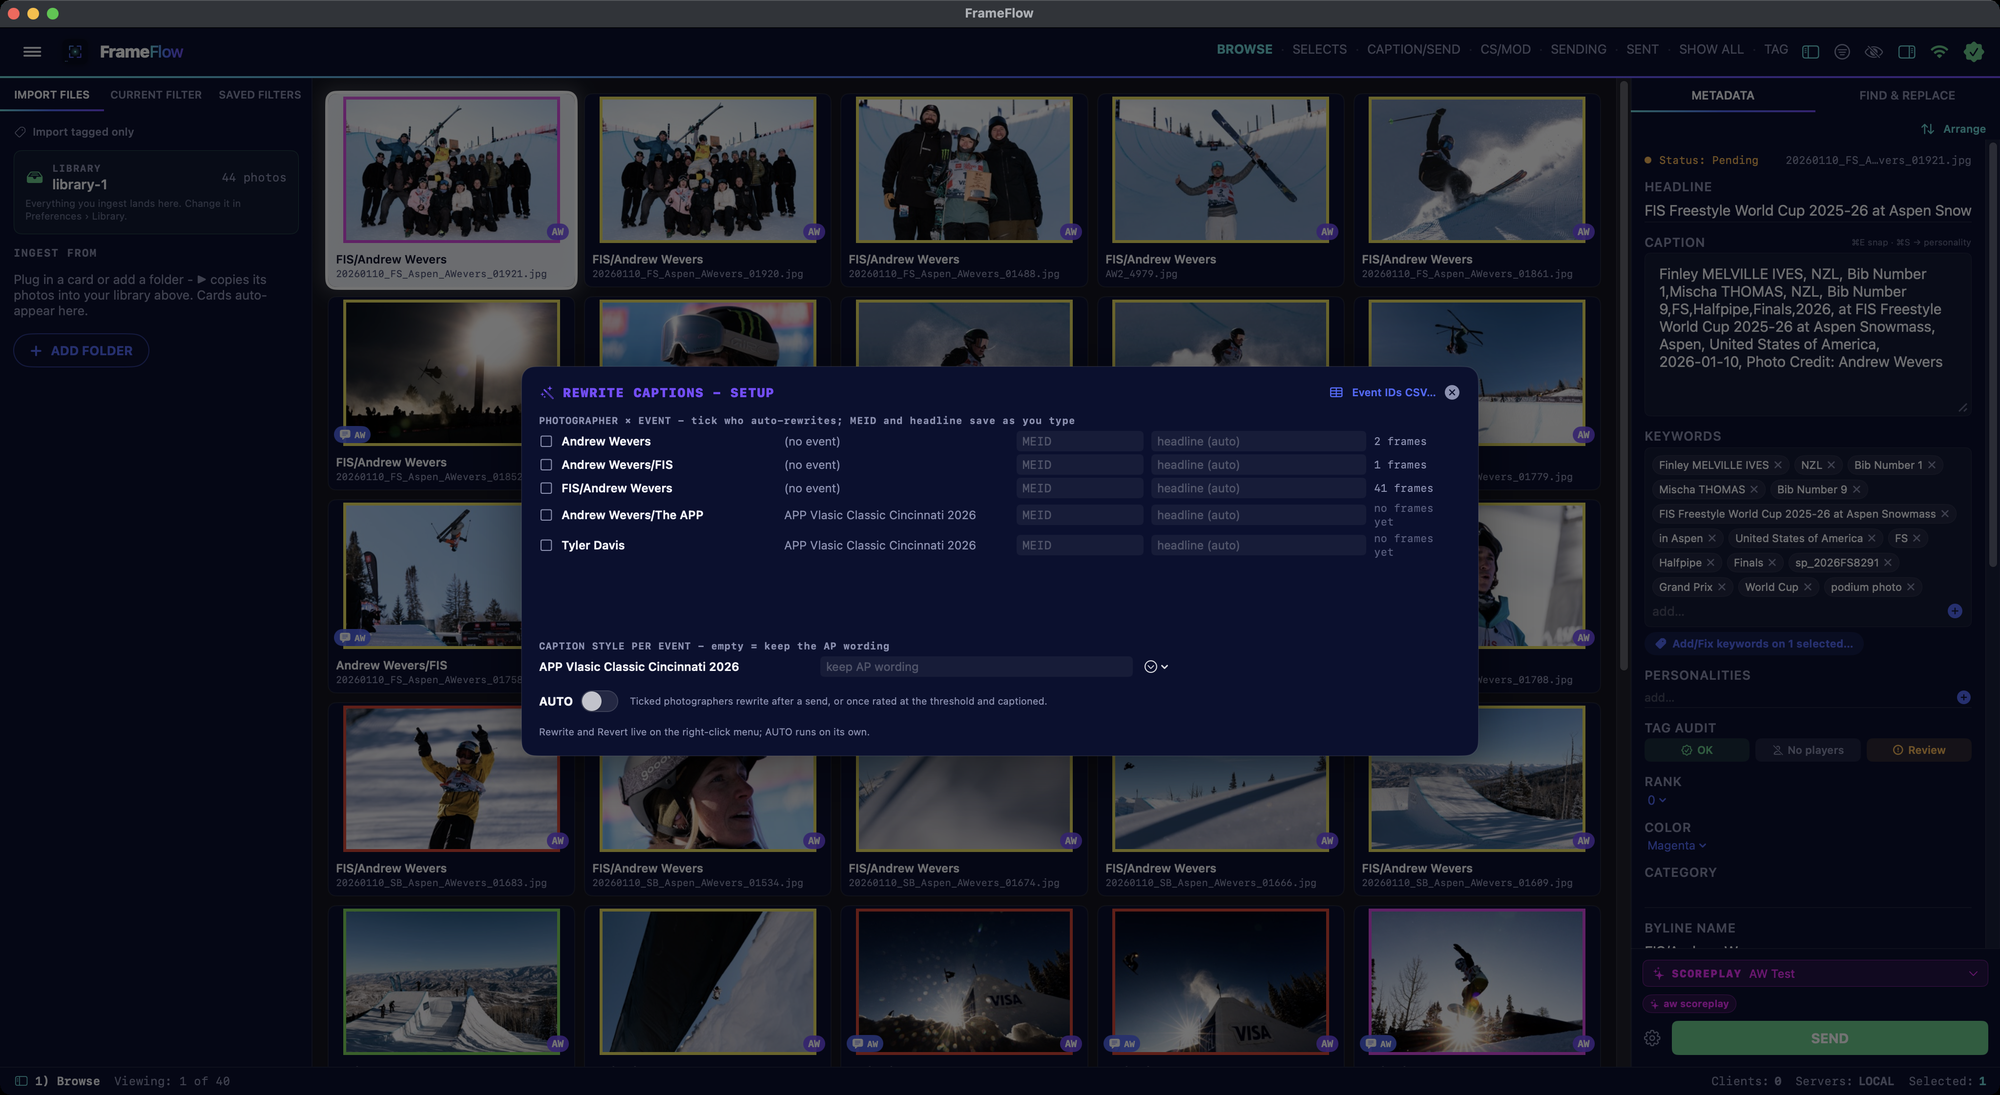
The wire-caption engine, built in. It takes a loose, AP-style game caption and rewrites it into clean wire-service form — names, event line, location, date and credit assembled the way the desk expects — per photographer, per event. Right-click a selection → Rewrite Captions on N Selected, or let it run on its own. (Editor/admin licenses.)
How does the setup work?
The roster lists every photographer in the library crossed with their event. Tick the ones whose captions should rewrite automatically; type each pairing’s event ID and headline once — they’re sticky, saving as you type and surviving restarts. An Event IDs CSV import fills the IDs for a whole season in one go. The per-event caption style keeps special wordings (wild-card, preseason, championship, or your own phrasing), and AUTO rewrites ticked photographers’ frames after a send — or as soon as a frame is rated at your threshold and captioned.
Can I undo a rewrite?
Yes. Rewritten frames wear a small wand pill; Revert lives on the same right-click menu and warns before it puts the original caption back. There’s also a Rewritten filter dimension, so a tab can show exactly what’s been through the engine.
Editing
How does editing work?
Select one or more frames and open them in Photoshop (⇧↵). RAW files open in Camera Raw automatically, and a multi-select opens them all into one Camera Raw filmstrip at once. When you save, the edited JPEG comes back into FrameFlow on its own and moves to Caption / Send — no manual export, no hunting for the file.
While a frame is open, a badge shows who’s editing it; once it’s saved, the edited badge shows who made the edit, and you can filter by that. Reject a frame in Camera Raw and FrameFlow marks it with a trash badge and hides it.
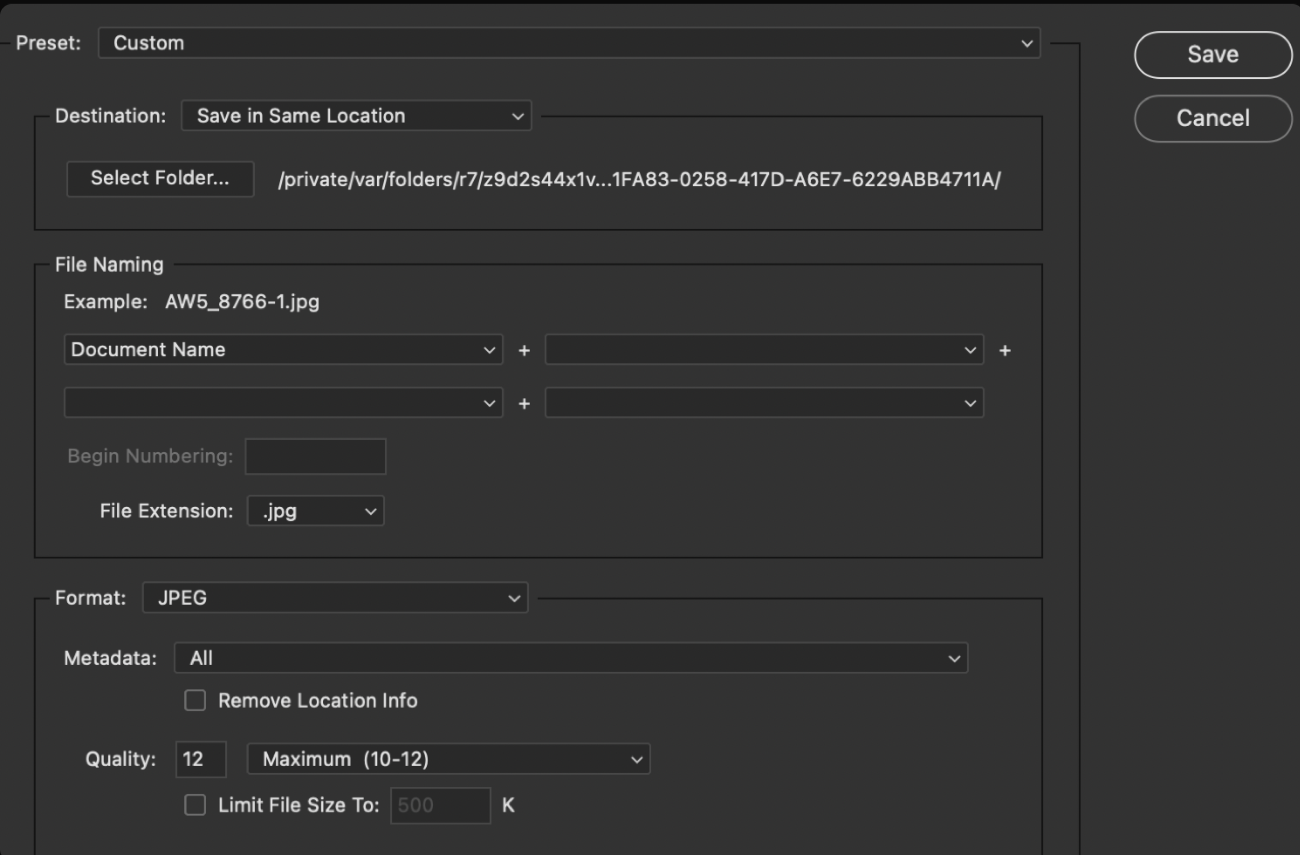
One-time Camera Raw setup — save back to the same folder. FrameFlow hands Camera Raw a copy in a temporary folder and watches that folder for your result. So in Camera Raw’s Save Options dialog, set Destination: Save in Same Location (not a fixed folder of your own). With that set, your edit lands back where FrameFlow is watching and returns automatically; if you save somewhere else, FrameFlow won’t see it (use Pull Edit, ⌘⇧I, to grab it). Camera Raw remembers this setting, so it’s a one-time change.
Filters & tabs
How do I filter the contact sheet?
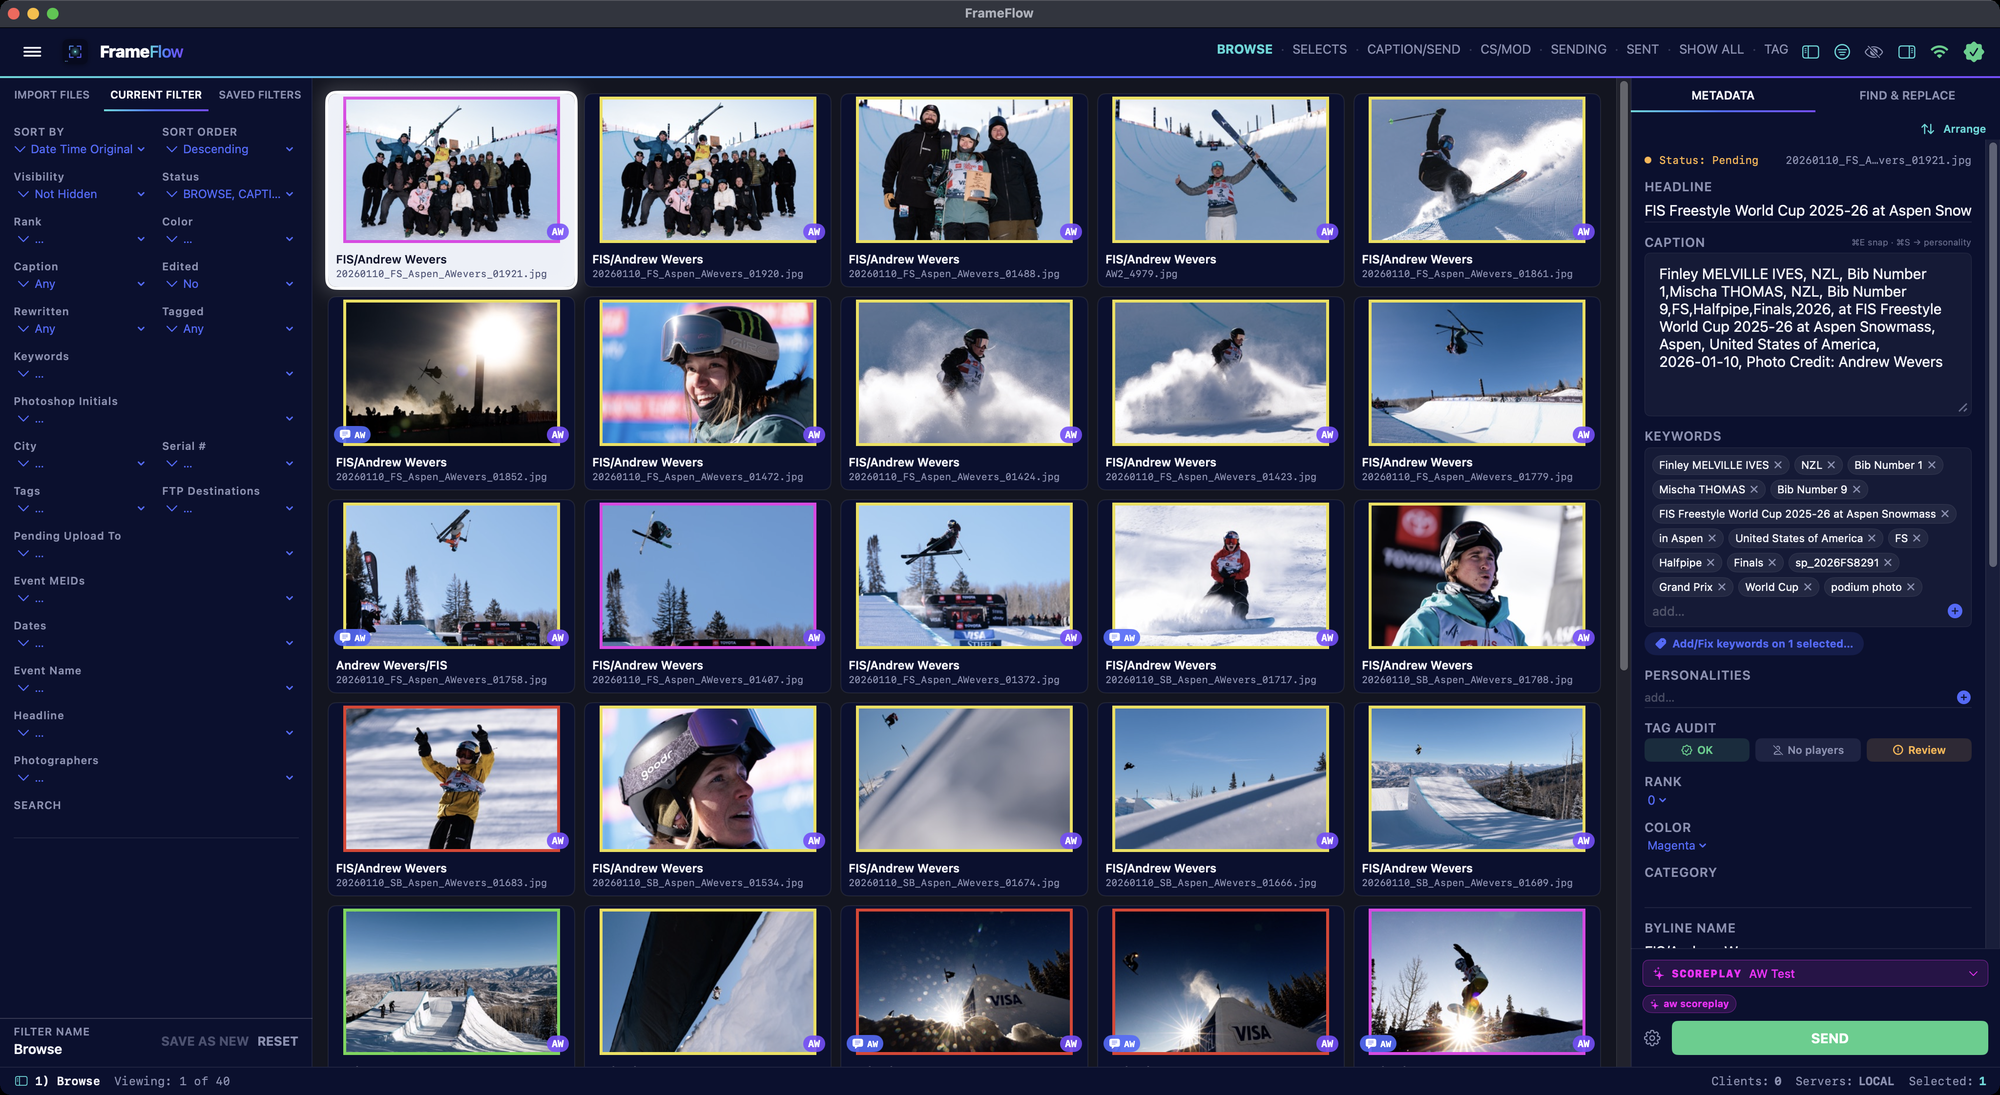
The Current Filter tab (left panel) narrows and sorts the live view on top of whichever tab you’re on. Filter by rank, colour, status, caption state, edited-or-not, rewritten, tagged, keywords, city, camera serial, who edited it, FTP destinations, pending upload to (a live outbound queue that drains as deliveries succeed), event IDs, capture dates (day-by-day on a multi-day event), event name, headline, photographer, and free search — and set the sort order. It updates instantly.
Can I customize what each tab shows?
Yes. The five workflow stages and your own saved filters live in one list you can reorder, turn on/off, and edit under Saved Filters. Drag a filter up or down to move its tab along the top bar; toggle one on to show it as a tab; tap a name to edit its rules (editing a default turns it into your own custom filter). Save a Current-Filter setup to add it as a new tab.
Delivery
How do I add a destination and send?
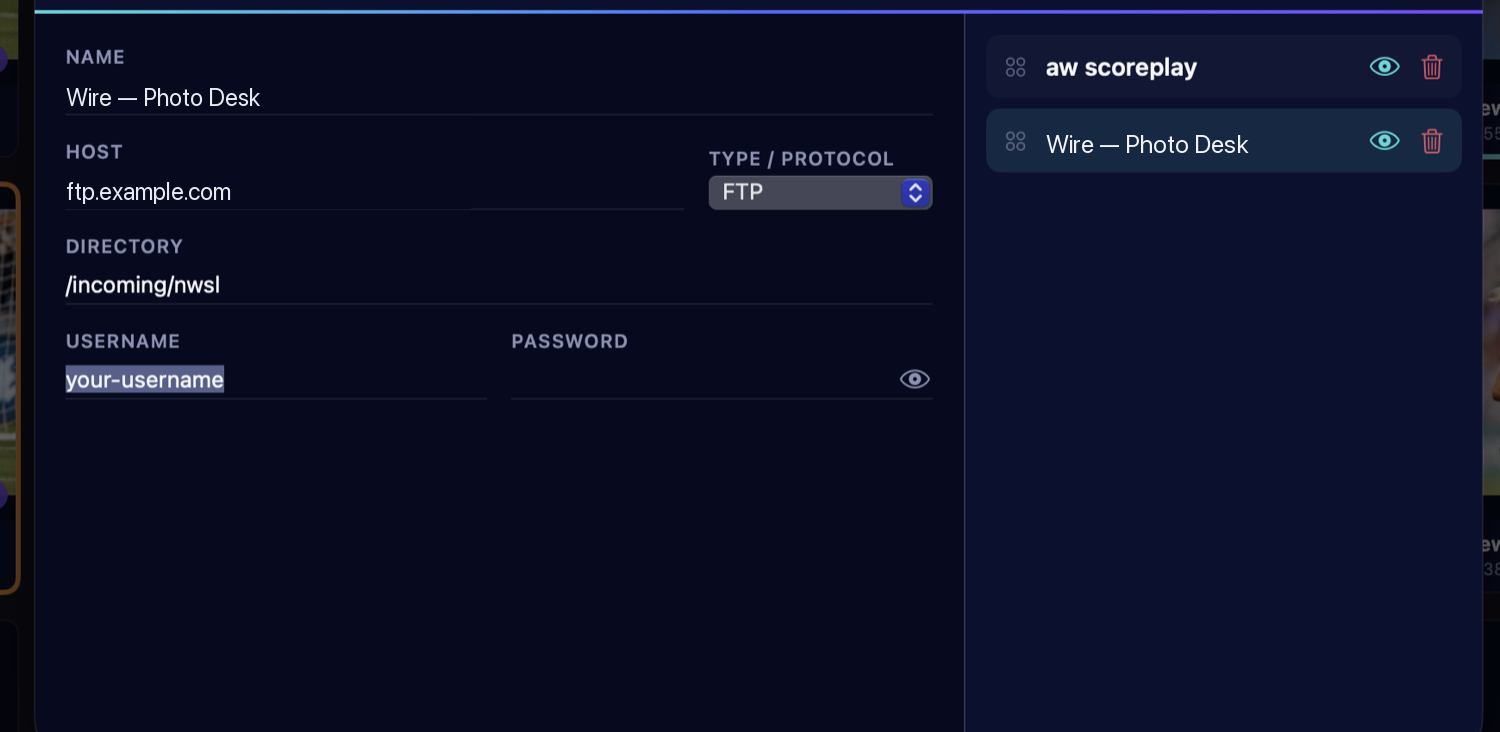
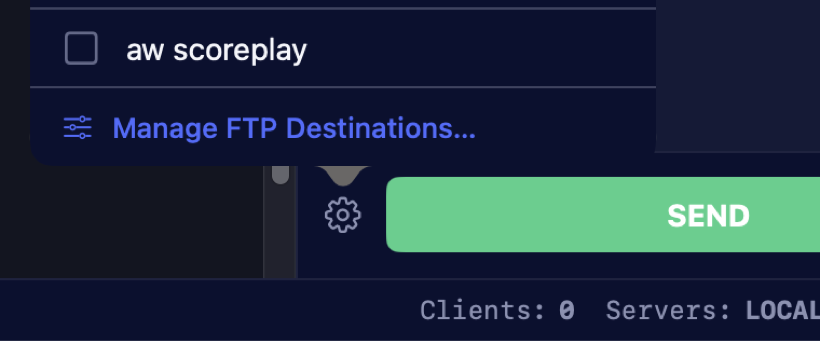
Open the cog by the Send button → Manage FTP Destinations, and add one or more FTP / FTPS / SFTP destinations (name, host, directory, username, password, protocol). Then pick which ones to send to from the cog’s checklist and hit Send — chips above the button show exactly where the send will go before you press it. Delivery runs in the background with a live status on each frame, and a clear error if something fails. In Preferences → Sending, Upload Threads sets how many files upload in parallel, and sends adapt automatically — backing off when a server is busy and climbing back as it recovers.
Can a destination be locked to one photographer?
Yes. Lock a destination to a photographer’s name and it highlights green when the selected frames match. Try to send someone else’s frames there and FrameFlow warns you with a per-clash summary first — Send Anyway is still one click when it’s intentional. It’s the guard rail for “every shooter has their own wire folder” events.
Does it integrate with Scoreplay?
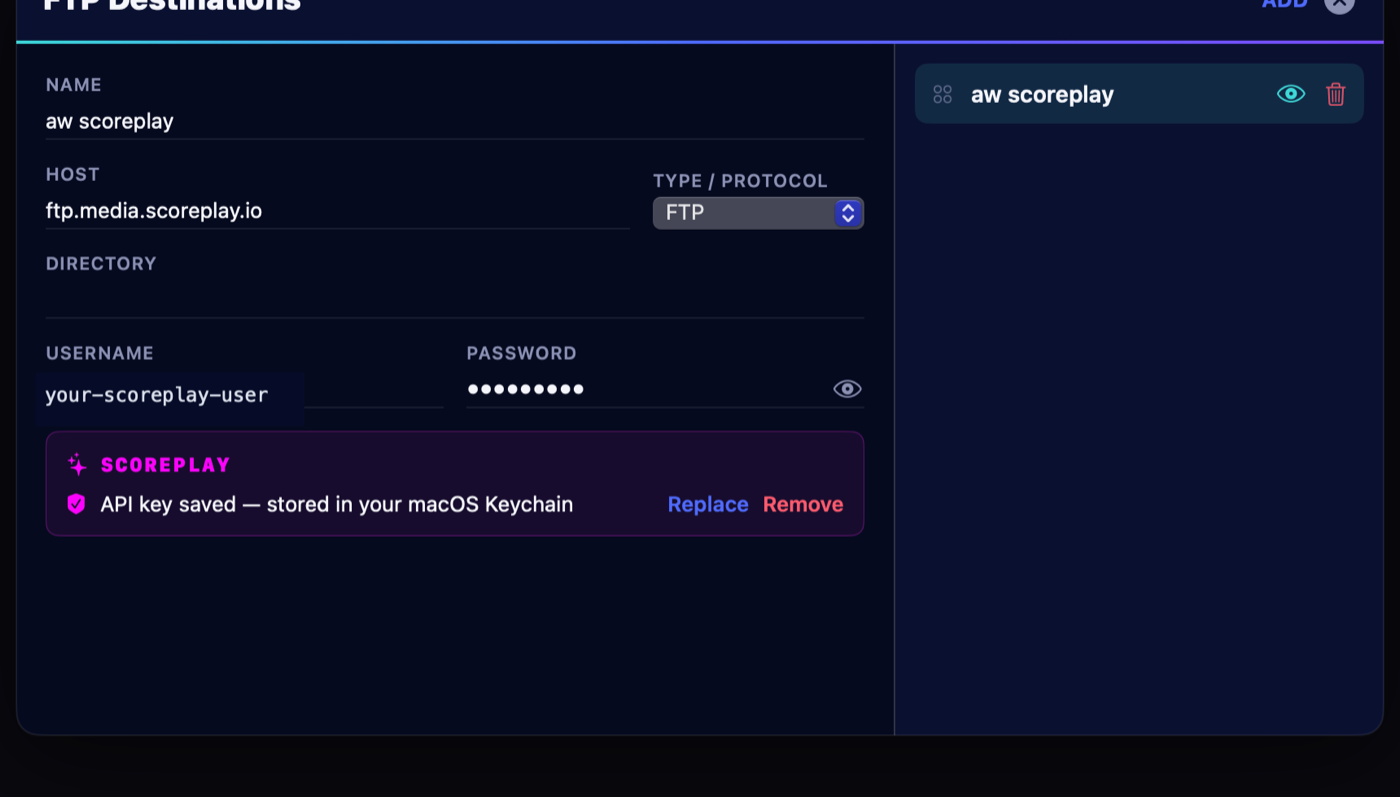
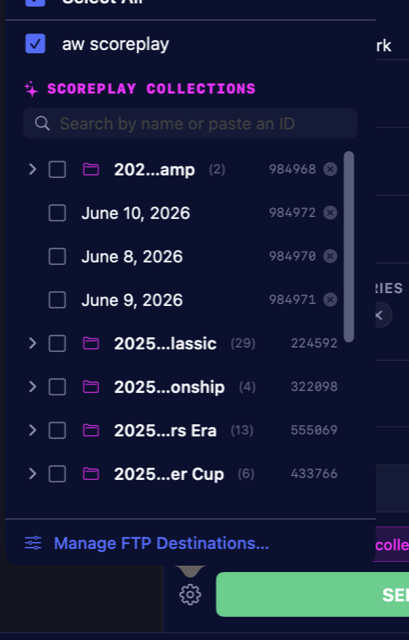
Yes. Add your Scoreplay media-upload host as a destination and FrameFlow detects it and unlocks a dedicated Scoreplay mode — the destination turns fuchsia, and you’re prompted for your API key, which is stored securely in the macOS Keychain (never in the config or on the wire).
From then on the Send panel shows a searchable Collections picker — a parent/sub-collection tree you can browse, filter by name, or jump to by pasting a collection ID. Pick a Collection and your selected frames upload straight into it via Scoreplay’s API — no FTP rename, no waiting for them to appear in an inbox.
Are there voice memos?
If a frame has a matching .wav voice memo next to it (a common in-camera workflow), FrameFlow pairs it to the image and gives you a play button — and the memo rides along when a client sends to the host.
Relay — speed to market
What is Relay?
Hands-off delivery for the frames that can’t wait. Any ingest source can relay — every new frame it pulls in is forwarded automatically to the FTP destinations you pick, the moment it lands, before anyone has touched it. A photographer transmits from the field, and their frames are on the client’s server seconds later while the edit desk works the take in parallel. Failed forwards retry on a ladder and survive an app restart; each frame wears a small branch pill showing its relay state (amber in flight, cyan delivered, red failed), and right-click → force relay re-sends any frame on demand. (Editor/admin licenses.)
How do I see how fast we’re delivering?
The caption panel’s Speed to Market field times each frame — capture, imported, upload started, upload completed — with copyable deltas, and Event Stats aggregates the same numbers into average and fastest capture-to-delivered times for the whole event, with a jump straight to your fastest frame.
Tag Audit (Scoreplay verification)
What is Tag Audit?
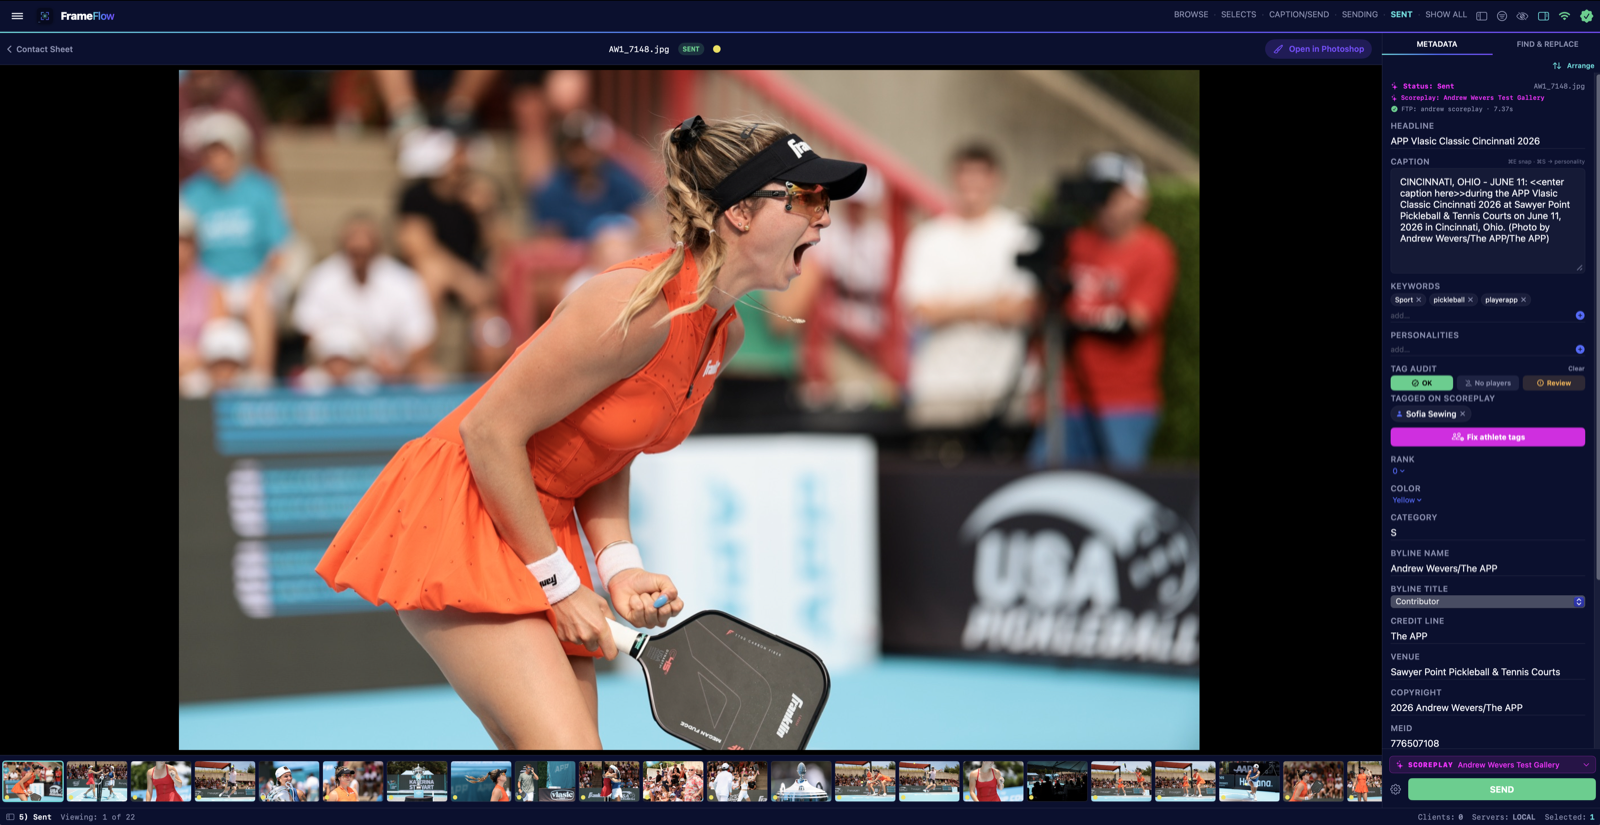
When frames land in a Scoreplay Collection, Scoreplay’s automatic tagging identifies the athletes in each image — and like any automatic step at a live event, it deserves a check before the client starts pulling images. Tag Audit is that check, built into the Sent tab: FrameFlow reads back what Scoreplay actually recorded for every delivered frame and shows you, at a glance, which frames are tagged correctly, which are missing names, and which have no athletes at all. No more flipping between FrameFlow and a browser to verify tags one image at a time.

How do I use it?
Turn the toggle on and the Sent tab becomes an audit board. The bar keeps a running count — to review, approved, and tag gaps — while each frame wears its status: a red NO TAGS ribbon when Scoreplay recorded no athletes, and a REVIEW badge until a human signs it off. Check tags re-reads everything on demand, Needs-review only hides the frames you’ve already cleared, and Approve All Shown signs off a screenful in one click when the tags look right.
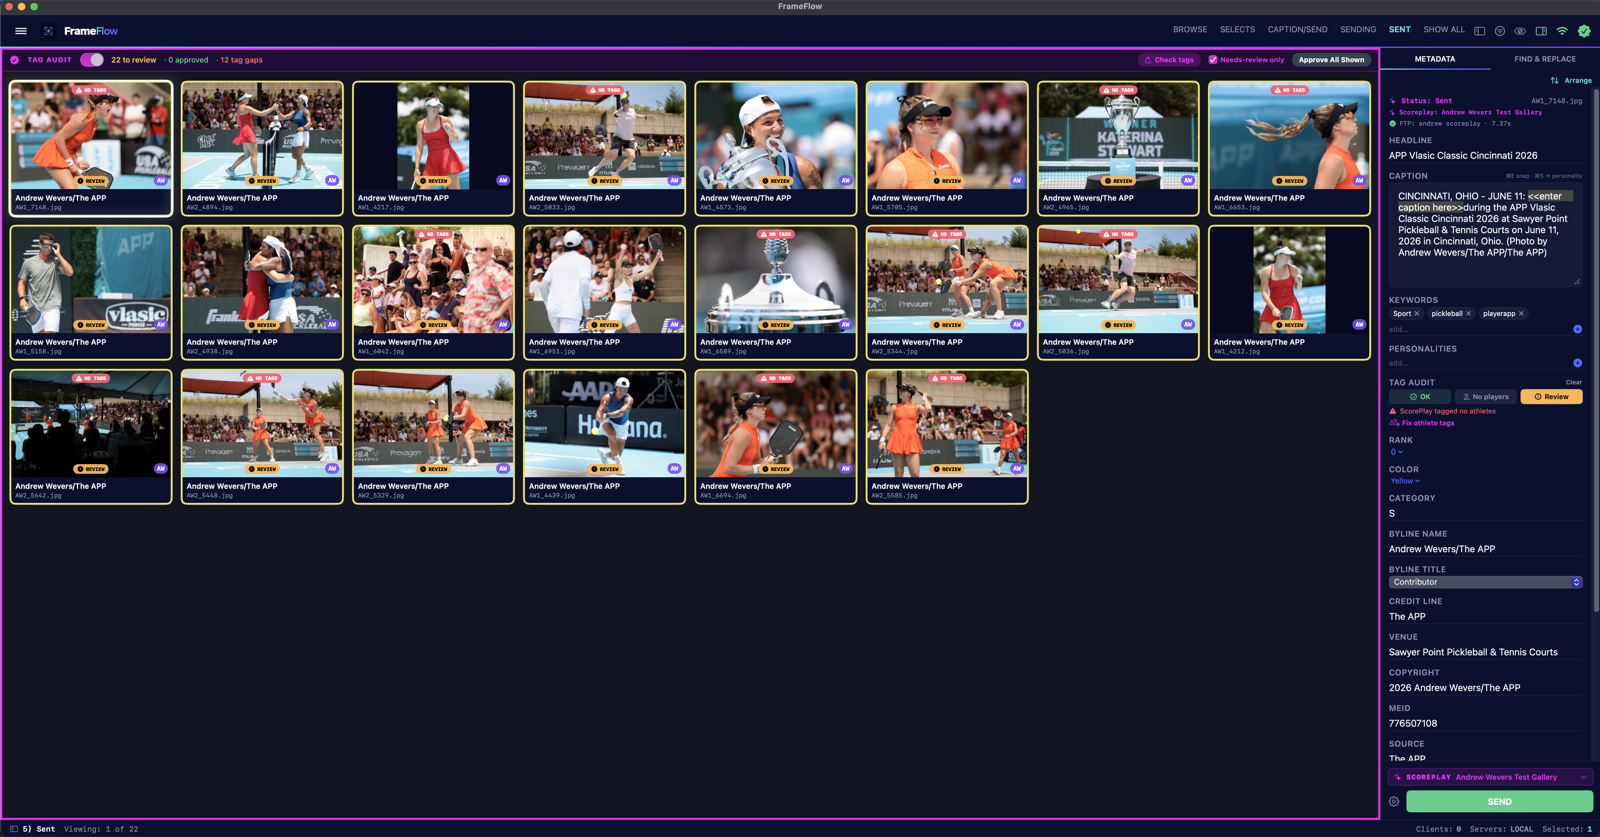
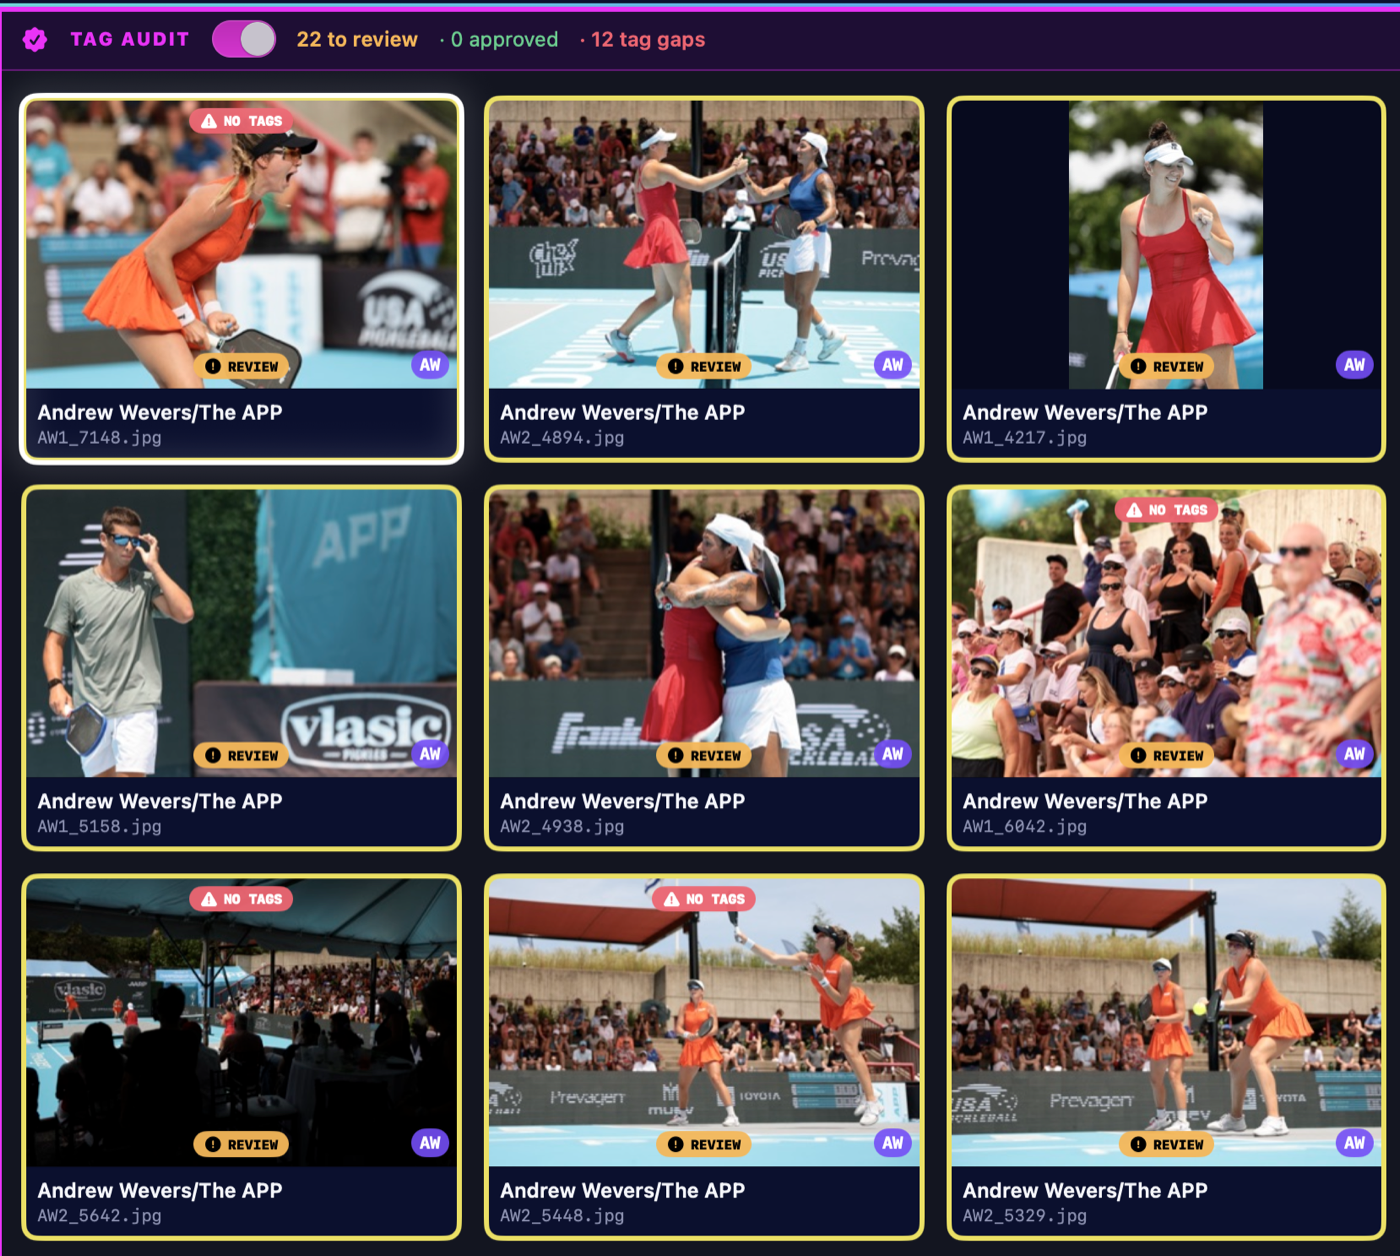
Scoreplay’s automatic tagging runs a little behind the upload, so a frame checked seconds after a send may briefly show NO TAGS. FrameFlow keeps re-checking quietly in the background and updates each frame as its tags appear — no need to keep pressing the button.
How do I sign frames off — and see who’s tagged?
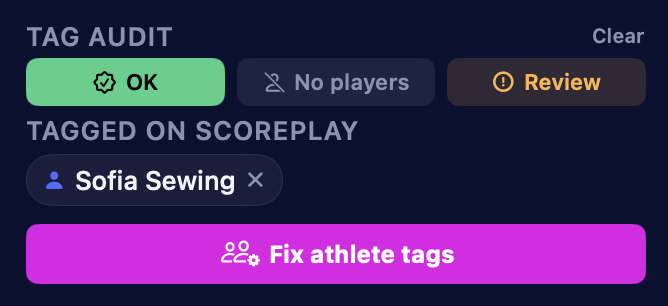
Each frame gets one of three verdicts from the TAG AUDIT chips in the metadata panel — or the keyboard, while auditing: 1 OK (the tags are right), 2 No players (nothing to tag — crowd, venue, detail shots), 3 Review (flag it for another look). Sign-offs sync live to every connected editor, so two people never audit the same take twice.
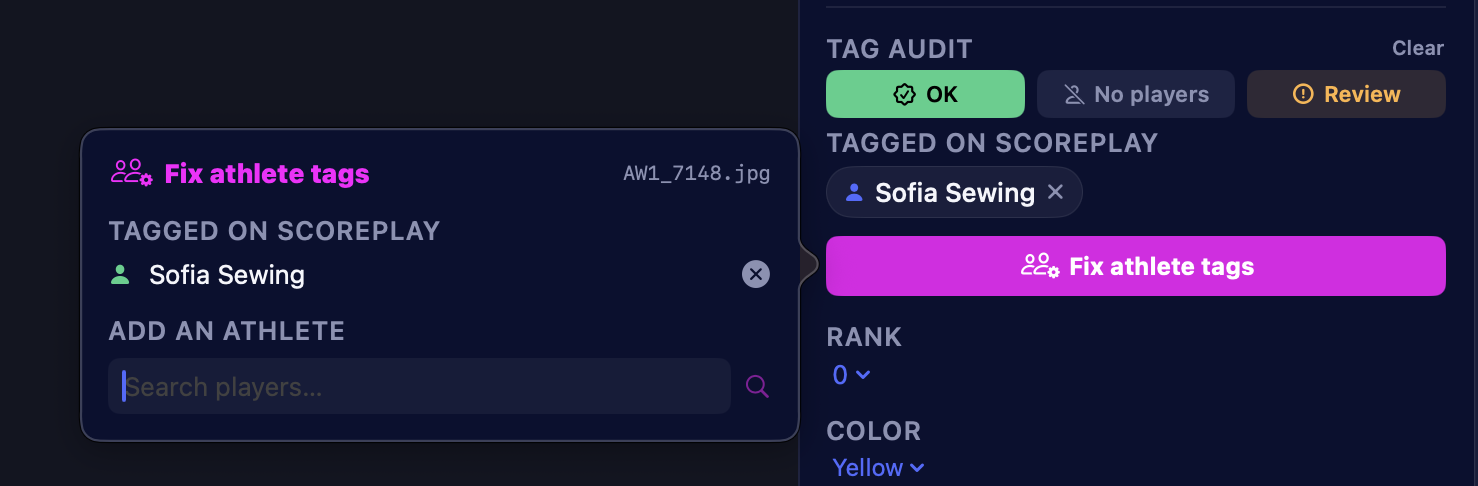
Right below the verdict chips, TAGGED ON SCOREPLAY shows every athlete Scoreplay has on the frame as a chip — just like Keywords. A green chip means the name matches your caption (verified); an amber chip is a caption name Scoreplay is missing, and clicking it opens the fix panel ready to add them. Clicking a chip’s × untags that athlete on Scoreplay directly (with a confirmation) — exactly like removing a keyword.
Can I fix a wrong or missing tag without leaving FrameFlow?
Yes — that’s the point. Fix athlete tags opens a panel showing exactly what’s tagged on Scoreplay right now, with the athlete search already focused — just start typing a name and press ↵. Add with + (or remove a wrong one), and FrameFlow pushes the correction straight to Scoreplay — then reads the frame back to confirm the change actually stuck before showing it as resolved.
How do I know when I’m done?
When every delivered frame is signed off, the board says so.

Exporting
How do I export edited images out of FrameFlow?
Select the frames you want, right-click → Open Export Dashboard (or open it from the menu), then New Export. Pick a folder, choose your resolution(s), choose a structure, and the job lands in the dashboard — press ▶ to run it with a live progress bar. Edited frames are written out with their captions and all IPTC/XMP metadata embedded; RAW originals are copied as-is.
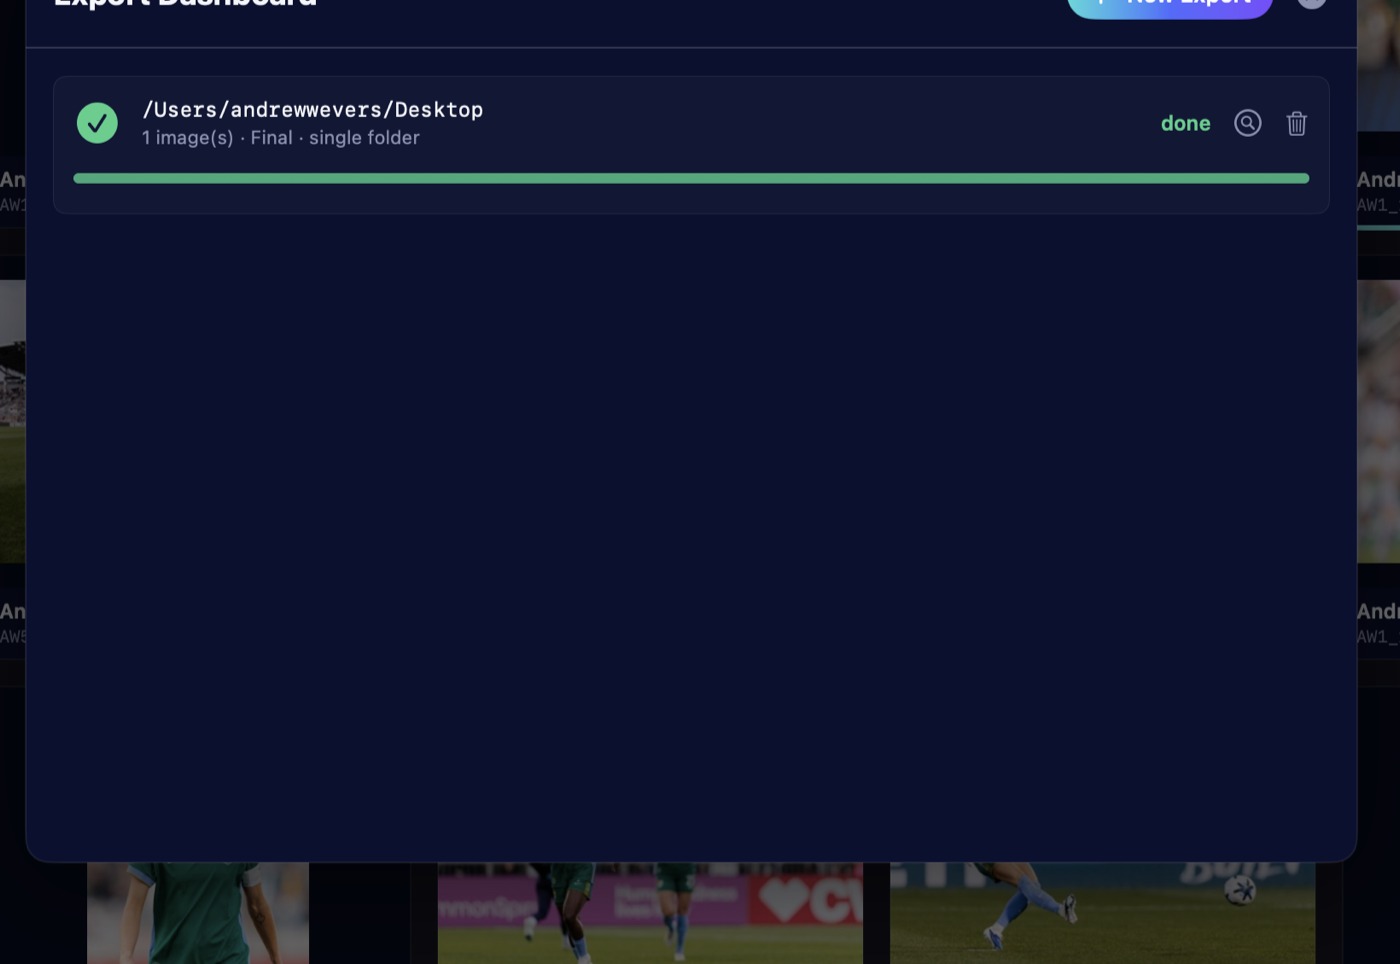
Choose any combination of resolutions — Original (the file as-is), Final (the full-quality edited JPEG), 3000 / 1920 / 720 (resized JPEGs), and Wav (the voice memo). Single directory drops everything in one folder; multiple directories makes one folder per size.
Can it build folders automatically from metadata?
Yes — that’s the subfolder template. Type variables like {event}/{photographer} and FrameFlow builds those folders per image from its own metadata, with a live preview as you type. Empty or unknown variables collapse away cleanly. The catalog covers the full Photo Mechanic variable set — hundreds of tokens for dates, camera EXIF, IPTC fields, sequence numbers and more — plus FrameFlow’s own, and the same variables work in caption text, headlines and other metadata fields, not just folder names. A few everyday ones:
{event} {photographer} {date} {year} {month} {day}
{city} {state} {credit} {source} {headline} {category}
{init} {serial} {color} {rank} {orig}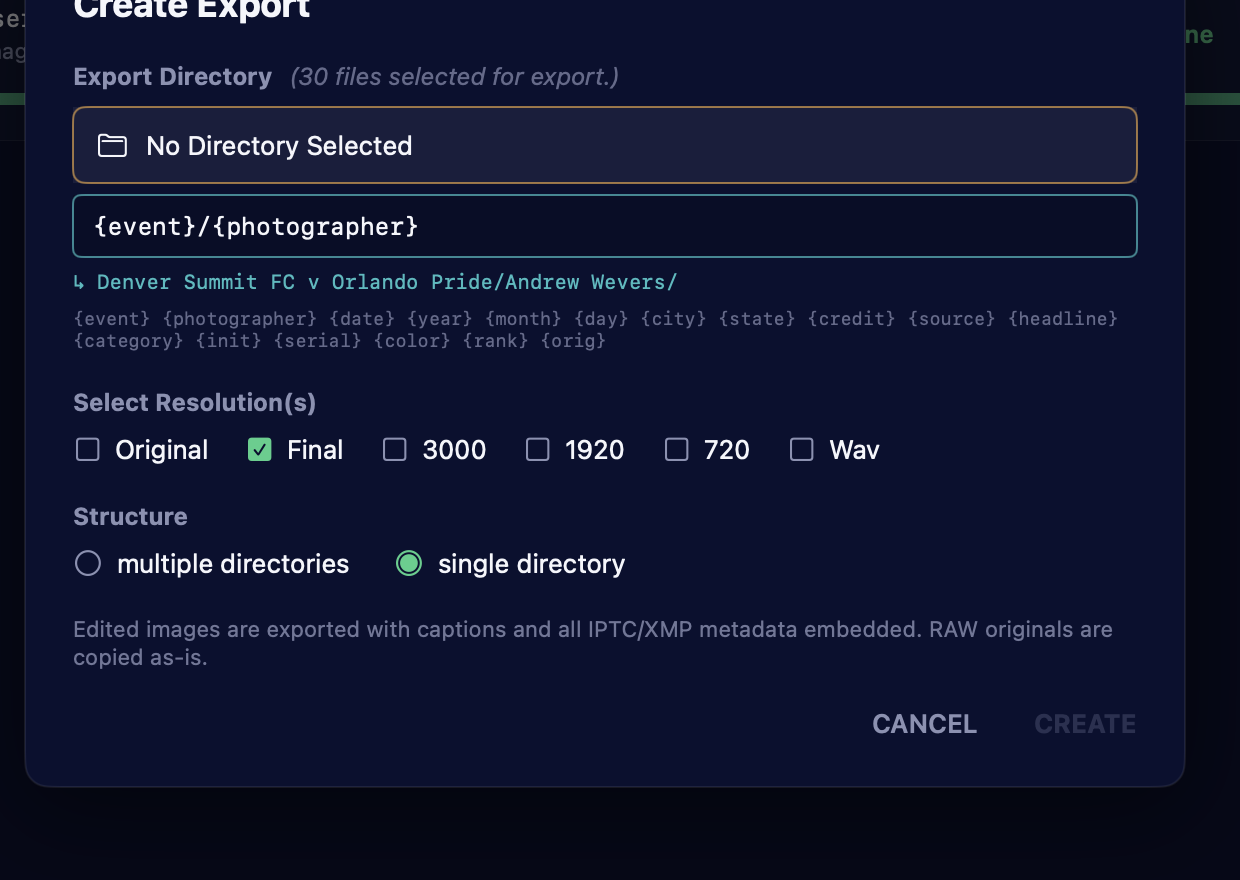
{event}/{photographer} previews to Denver Summit FC v Orlando Pride/Andrew Wevers/. Tick the sizes you need.Event Stats
How do I see how the event went?
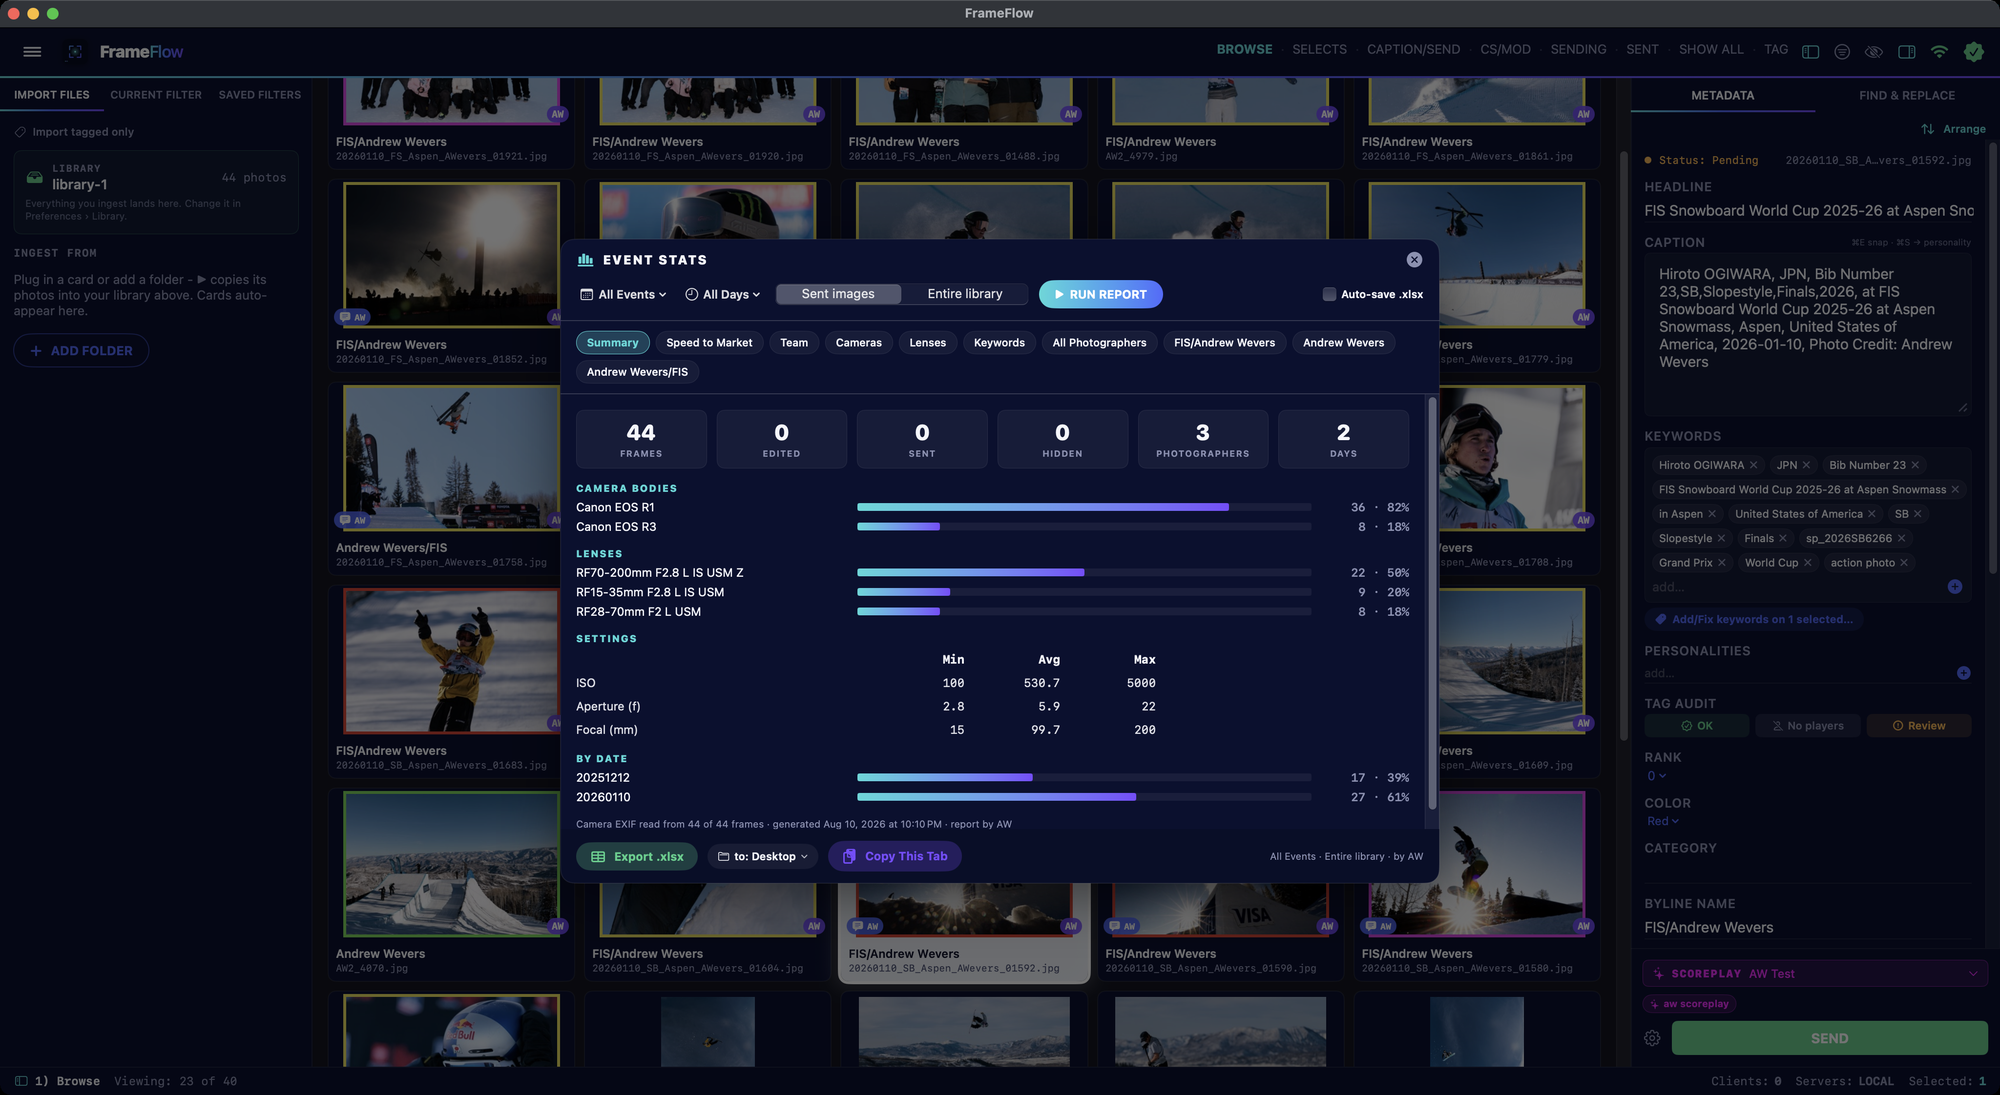
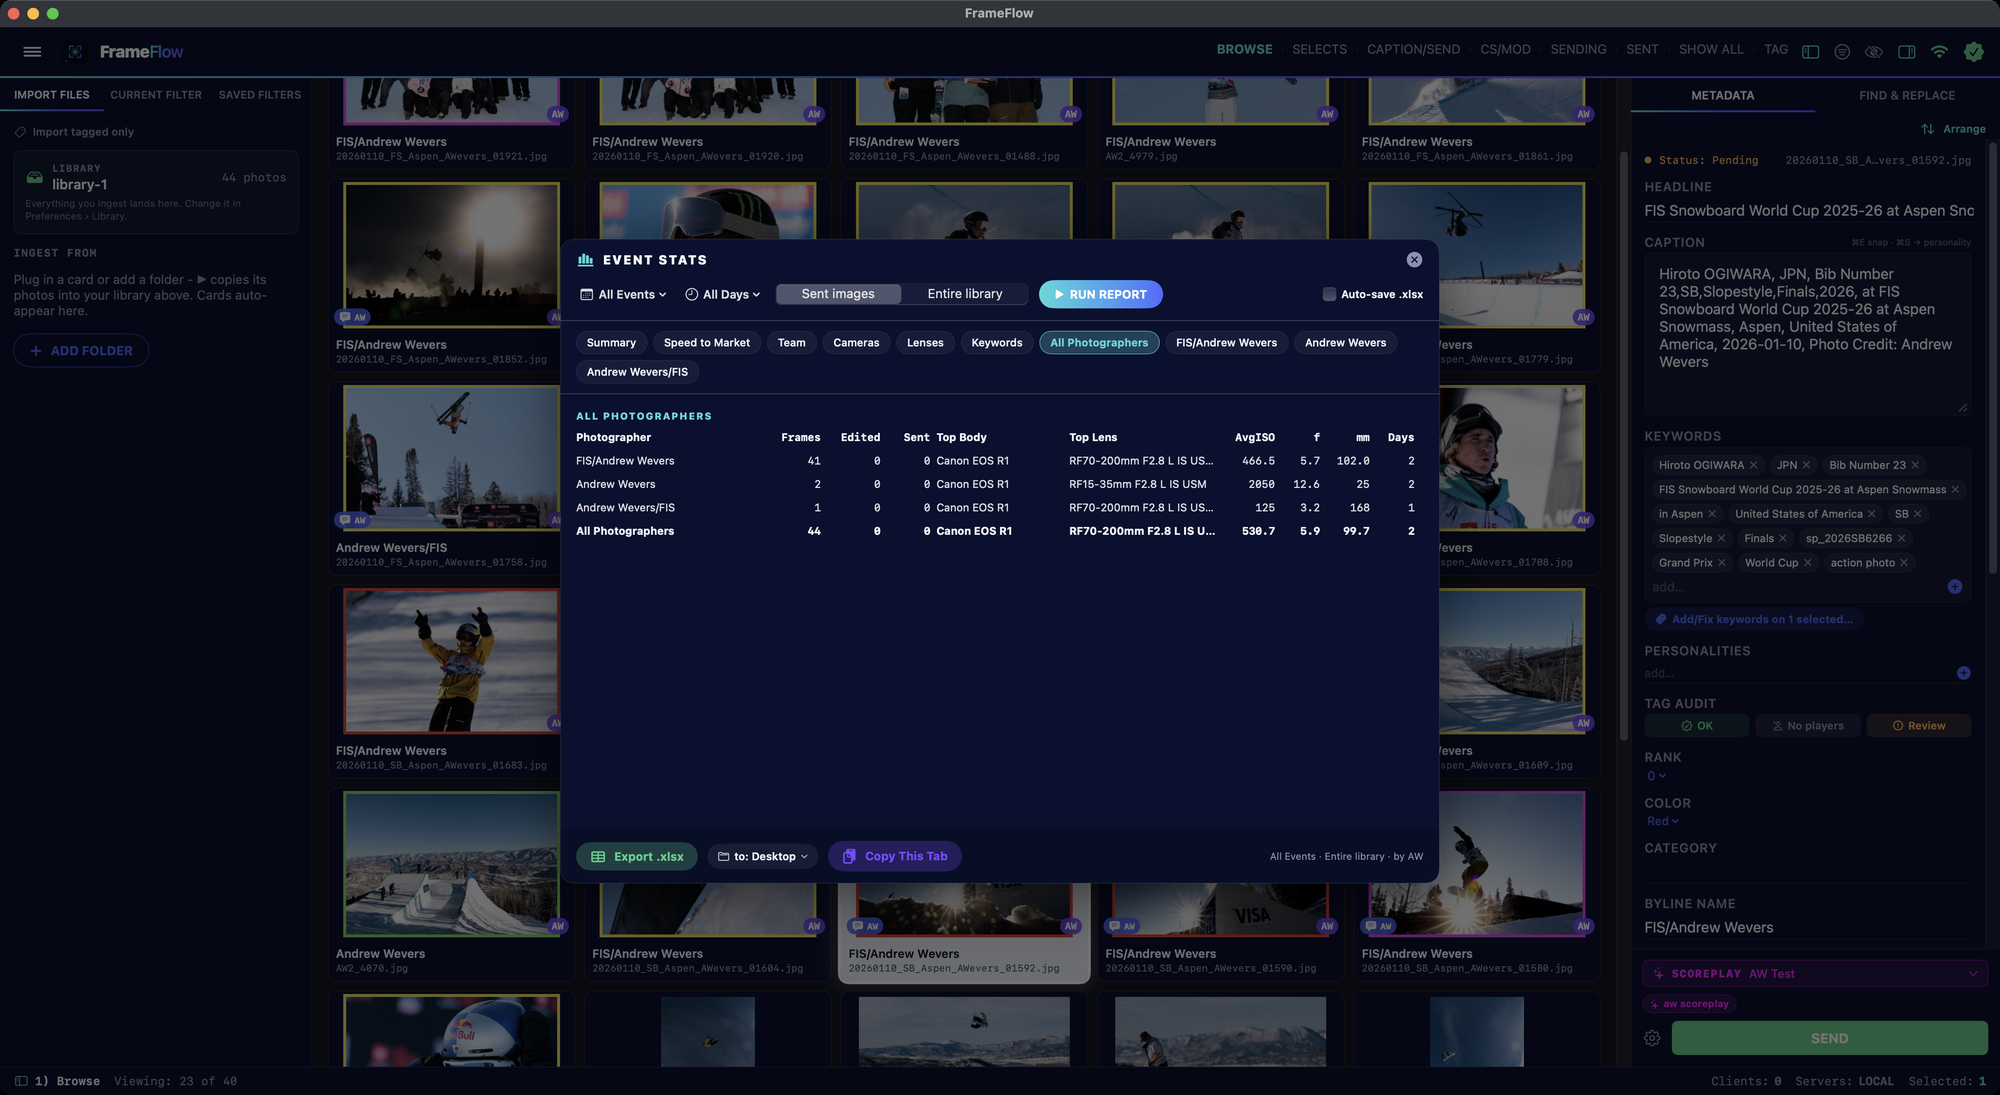
Event Stats (hamburger menu) turns the library into a report: frames, edits, sends, photographers and shoot days up top, then camera bodies, lenses, exposure settings (min / average / max ISO, aperture and focal length) and a day-by-day breakdown. Scope it to an event, a day, sent images or the entire library with the pickers, press Run Report, and flip through the tabs — Summary, Speed to Market, Team, Cameras, Lenses, Keywords, and one tab per photographer.
Can I share the report?
Copy This Tab puts a clean image of the current tab on the clipboard for the group chat; Export .xlsx writes the whole report as a spreadsheet (with an auto-save option so every run lands in your chosen folder). In a hosted session the host computes the numbers for everyone — and there’s a report link teammates can open in a browser, no FrameFlow install needed.
Live Log
How do I watch everything that’s happening?
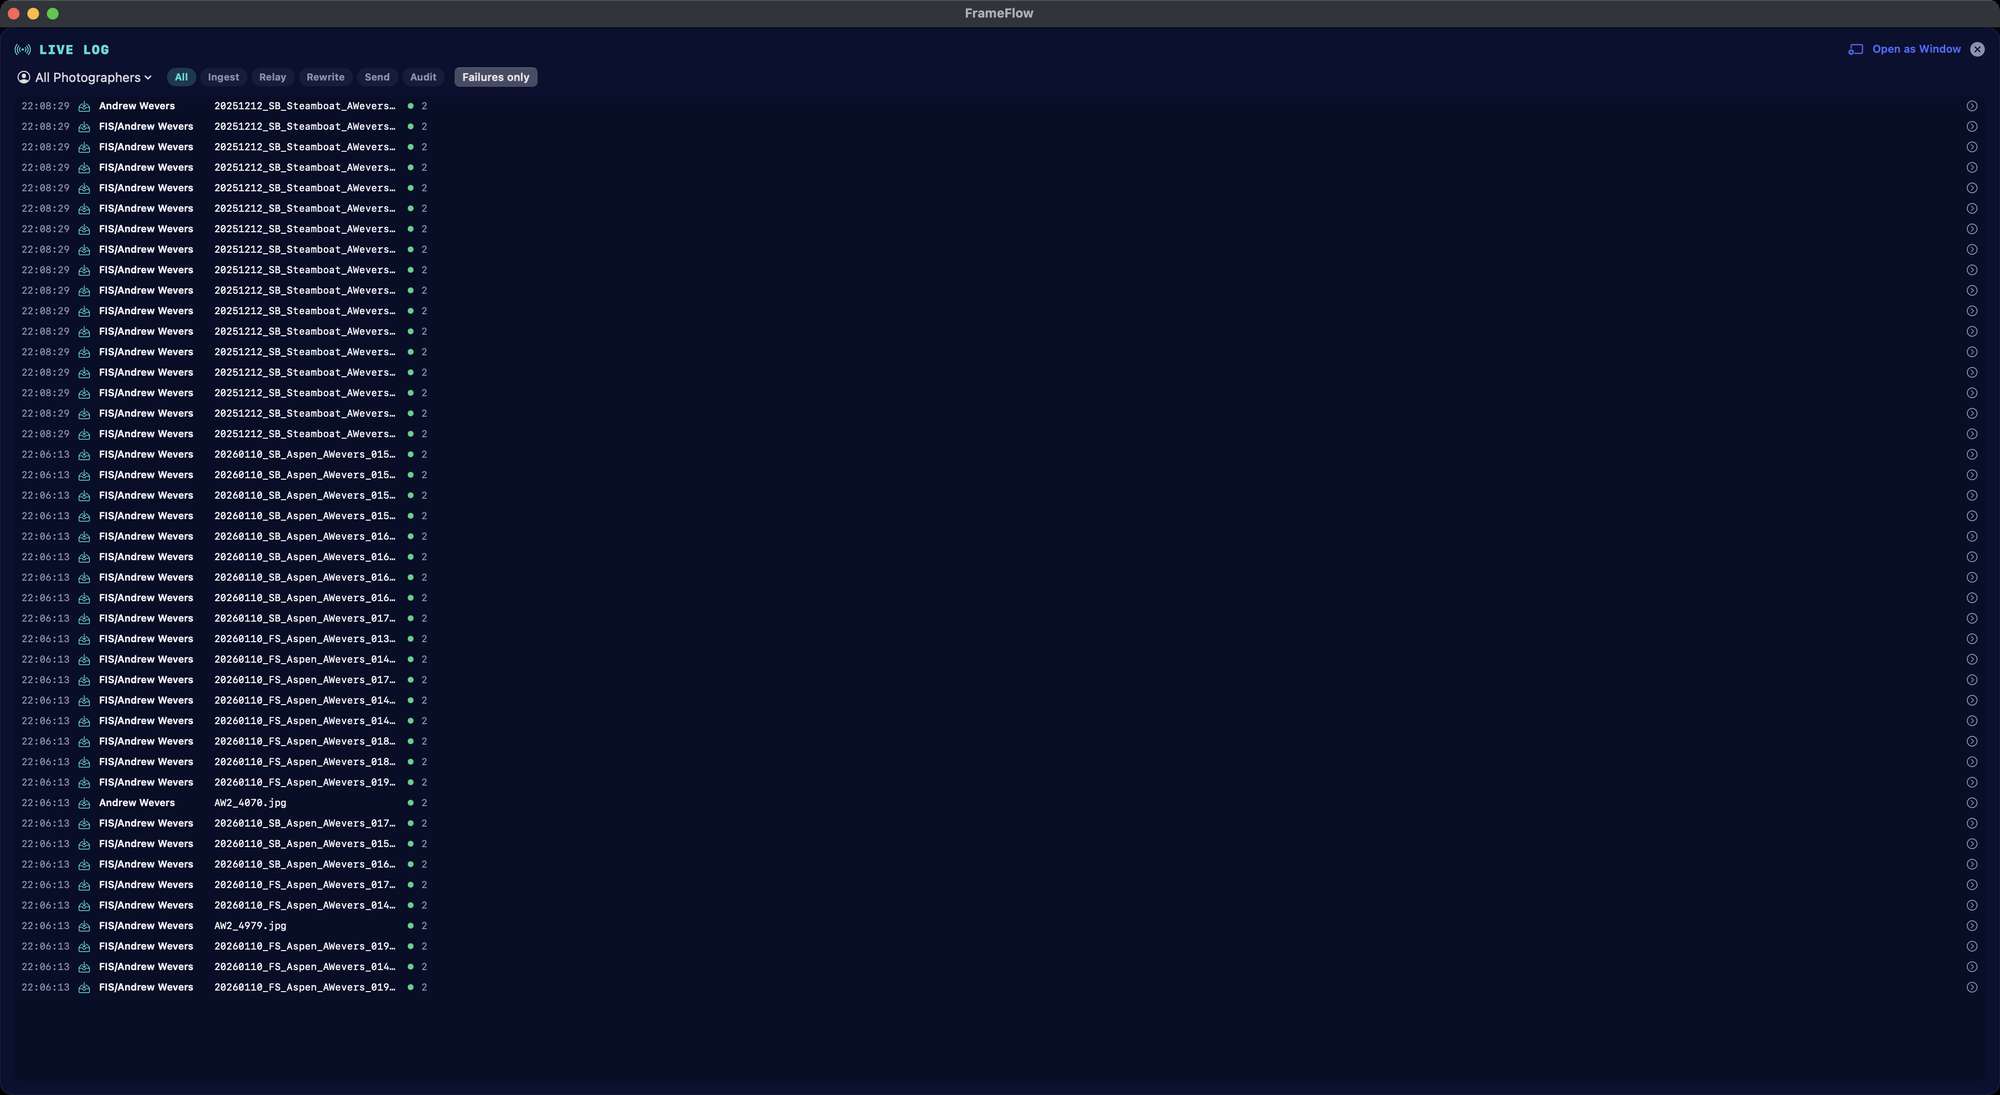
The Live Log (hamburger menu) is the operational feed of the whole session — every ingest, relay, caption rewrite, send and audit event as it happens, newest first. Filter by photographer or by lane — Ingest, Relay, Rewrite, Send, Audit — or flip Failures only when you only want the problems. Click a row to jump straight to that frame; pop the log out to its own window for a second display. When you’re joined to a host, you’re watching the host’s log — the whole desk sees the same truth. (Editor/admin licenses.)
Live collaboration
How do several people work the same shoot?
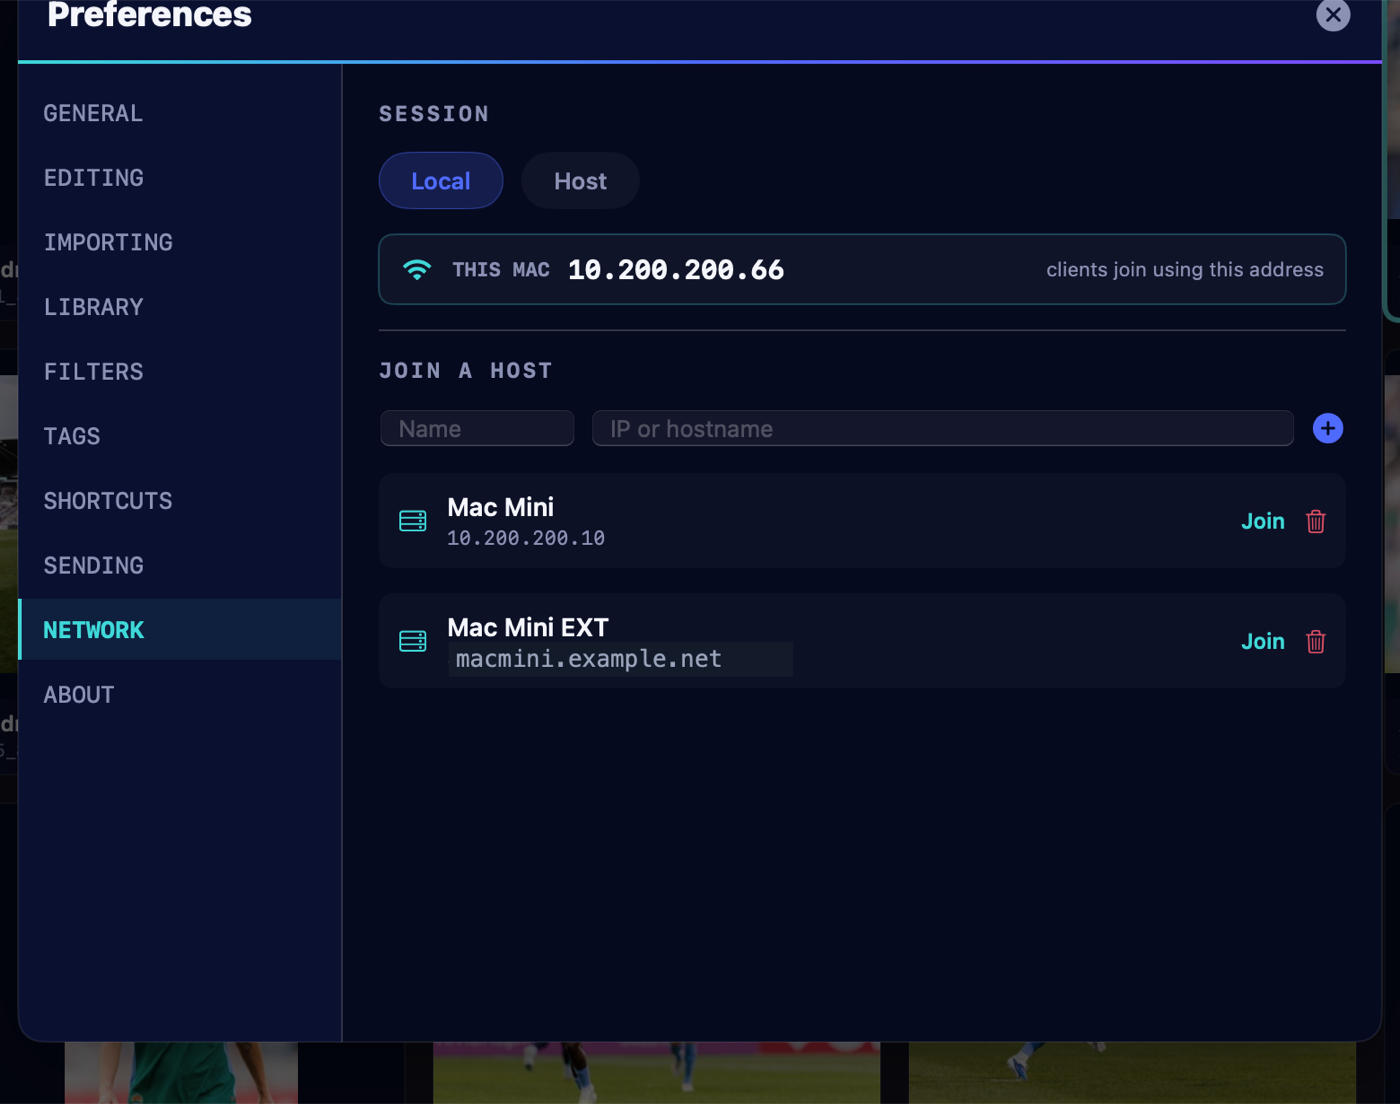
One machine hosts the library; everyone else joins it. In Preferences → Network, the host switches Session to Host; the panel shows the address clients use to connect. On the other machines, type that address under Join a host (or pick a saved host) and click Join. From then on, ranks, colour labels, captions, edit locks, events, and sends sync live to everyone. The host’s client roster lists every connected editor with the address they’re connecting over, and each joined Mac sees the same list.
Versions must match. A Mac joining on a different FrameFlow version is turned away with an Update button — mixed versions in one session caused too many subtle disagreements. Working locally or hosting is never restricted.
Does collaboration work locally and over the internet?
Both. On the same network, editors join by the host’s LAN address — no internet involved. For remote editors, the host can be made reachable over the internet: point a hostname (or your public IP) at the hosting machine and forward the host’s ports to it on your router. Remote editors then join using that public address and work the live take exactly as if they were in the room.
So the internet itself isn’t required — a local session needs none — but FrameFlow is built to run a session over it when your team is spread out. (The internet is also used for one-time license activation and for delivery to FTP / Scoreplay.)
It says I’m hosting but a teammate can’t see the photos.
Usually the network path between the machines:
- Local editors: make sure every machine is on the same Wi-Fi / LAN (guest networks and “client isolation” will block it). If joining by computer name doesn’t work, try the host’s IP address.
- Remote editors: confirm the host’s public address resolves to the hosting machine and that your router forwards FrameFlow’s ports to it; remote editors join using that public address.
- Firewall. Allow FrameFlow to accept incoming connections on the host (System Settings → Network → Firewall), or turn the firewall off for testing.
Image properties
Where do I see the technical details of a frame?
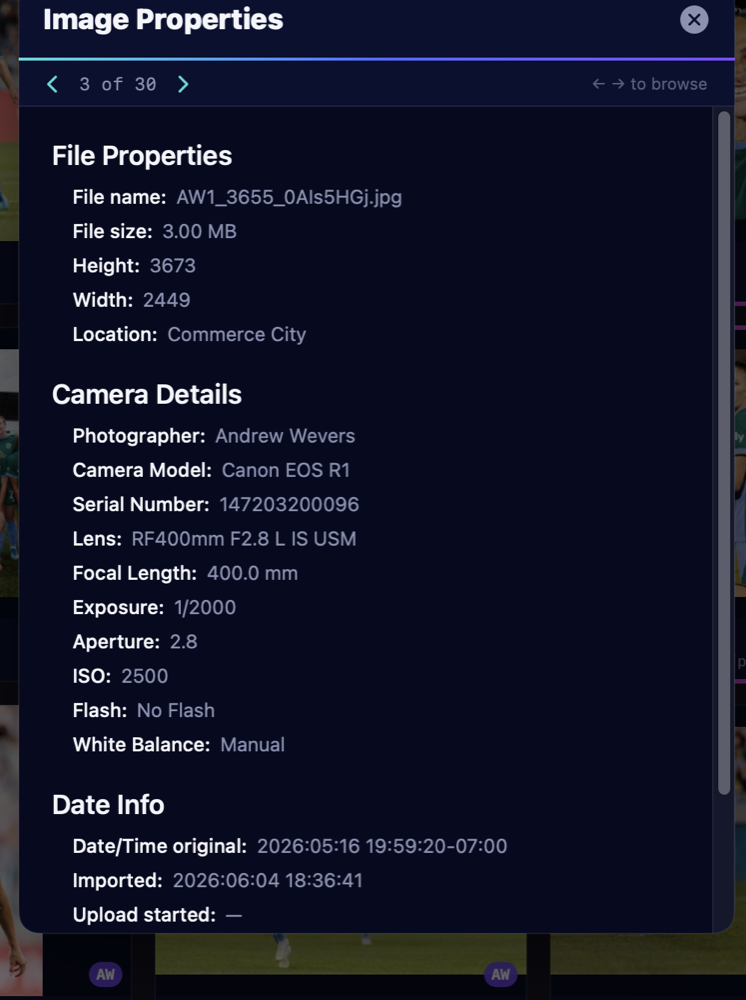
Right-click → View Image Properties for the full read-out: file name and size, dimensions, camera body and serial, lens, focal length, exposure, aperture, ISO, flash, white balance, and the original capture and import times — shown in local time with the zone named, honouring what the camera recorded. An Editor Info block names who captioned, edited and tagged the frame with full names resolved from their licenses, not just initials. Any line can be selected and copied — or Copy All for the lot. Step through frames with ← → (or ↑ ↓ row by row) — the contact sheet scrolls along behind so you always see what you’re inspecting.
Preferences
What can I configure?
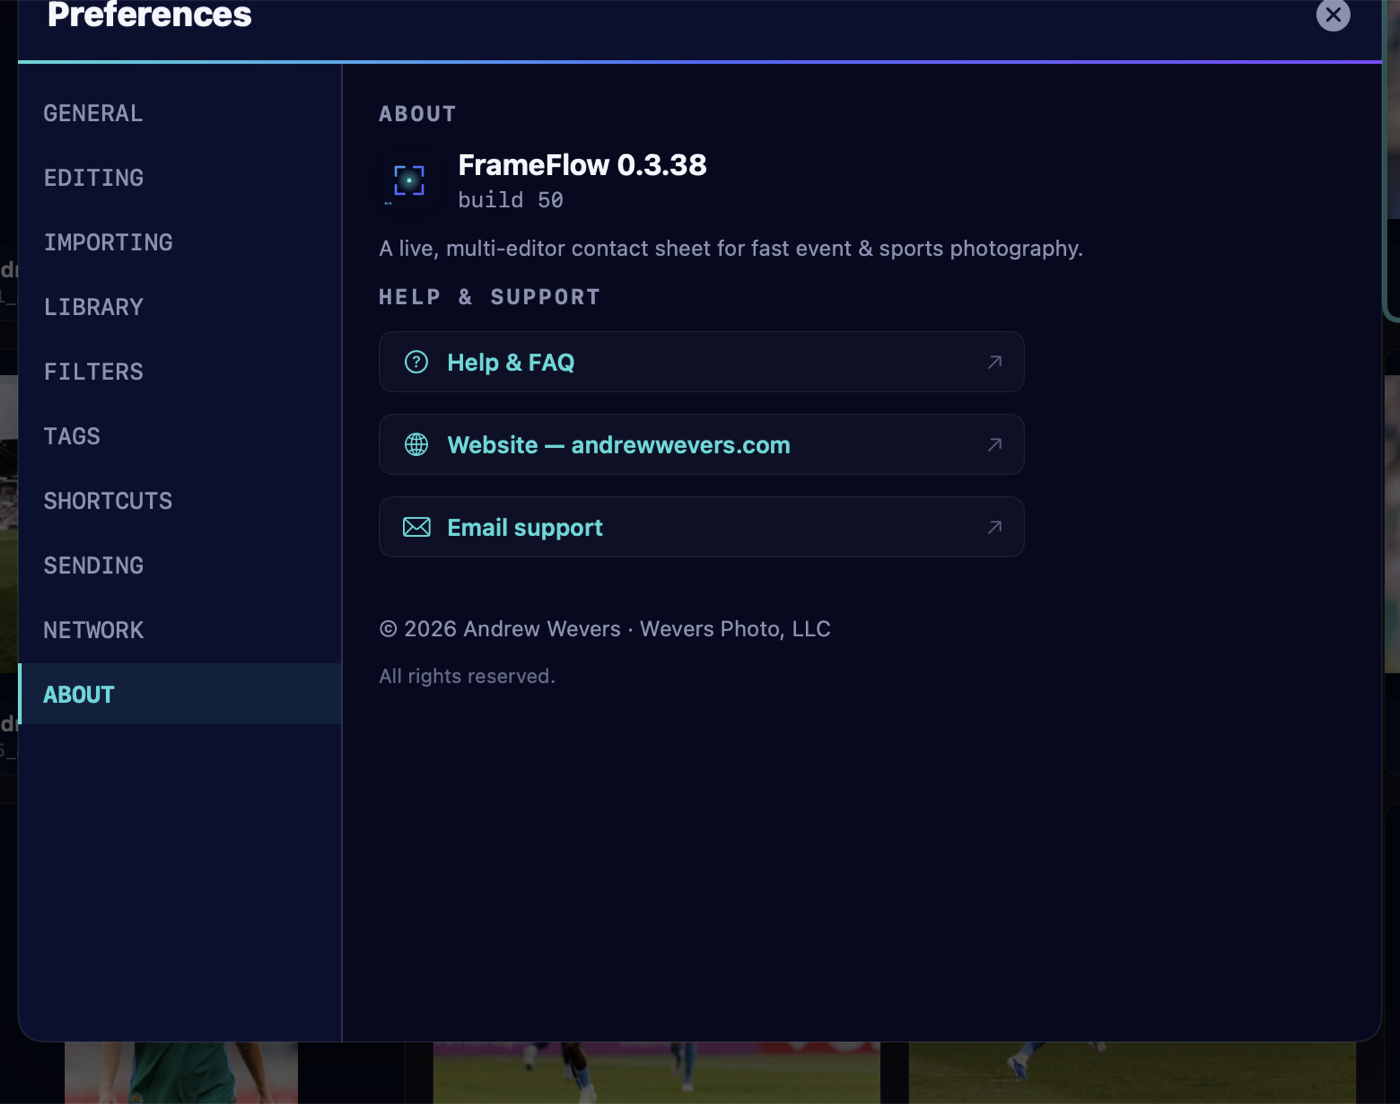
Preferences (from the menu) is organized into panes down the left — General, Editing, Importing, Library, Filters, Tags, Shortcuts, Sending, Network, and About. Click anywhere on a row to switch panes.
Keyboard shortcuts
Are there keyboard shortcuts, and can I change them?
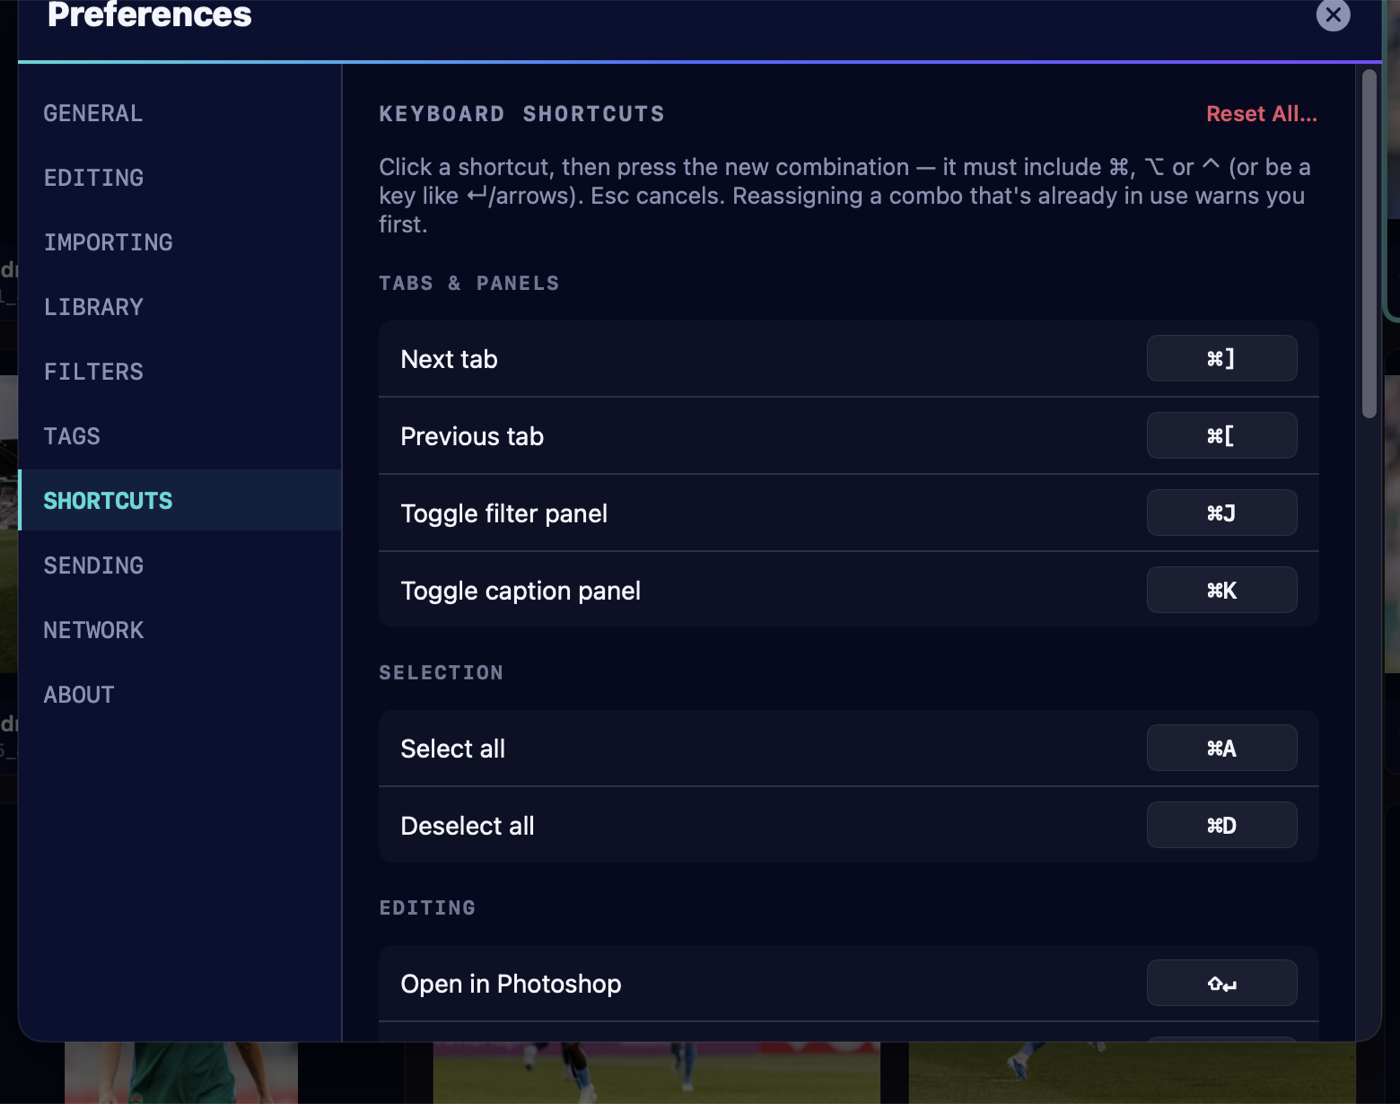
Plenty — and every command shortcut is editable in Preferences → Shortcuts. Click one, press the new combination; if it clashes with another action, FrameFlow warns you first. A few defaults:
- 1–8 colour class · 0 clear · Space rank · H hide
- ⇧↵ open in Photoshop · ⌘E snap to caption · ⌘K caption panel · ⌘J filter panel
- ⌘F freeze / unfreeze · ⌘⇧U hide uncolored · ⌘⇧I pull edit
- ⌘] / ⌘[ move right / left through the tabs · ← → move between frames
- ⇧⌘A Tag Audit on the Sent tab · 1/2/3 sign off OK / No players / Review while auditing
The single-key tagging controls (colour, rank, hide) are fixed by design and shown for reference in the same panel.
Dependencies
Do I need to install anything else?
No. The metadata engine is bundled inside the app and runs on the software macOS already ships with, so reading camera details and writing IPTC captions works on a clean Mac with nothing extra installed.
Your files & privacy
Where are my photos kept, and is anything uploaded?
FrameFlow is local-first. Your originals, edits, and voice memos live in your library folder on your own disk; app state and thumbnails live alongside them in a hidden .frameflow folder. Nothing about your images is sent anywhere except the destinations you choose to deliver or export to, and the editors you invite into your session. A collaboration session connects directly between the host and the editors you bring in — whether they’re on your local network or joining remotely over the internet.
If I delete a frame, does it stay gone?
Yes. A deleted frame is tombstoned so re-ingesting a different source can’t resurrect it, and ingesting overlapping cards won’t flood you with duplicates. If you really want it back, re-ingest the same source it came from.
Troubleshooting
“FrameFlow is damaged / can’t be opened.”
That’s Gatekeeper quarantining a directly-downloaded app on an older system. Right-click → Open, or run the xattr command in Installing.
Thumbnails spin forever after joining a host.
Make sure both machines are on the same network and that FrameFlow is allowed through the firewall on the host. If you joined by computer name, try the host’s IP address.
“Import tagged only” brought in nothing.
That means none of the frames on the card were locked in-camera. Lock your keepers on the camera (or turn the setting off to import everything). Remember the lock only survives a direct-from-card ingest.
A frame I expected didn’t ingest.
If it was still copying, FrameFlow held it until it finished (see Wait for complete files) — give it a moment, or press ▶ again. If you’d deleted it earlier, re-ingest its original source to bring it back.
An edit didn’t come back from Photoshop.
Save the file (don’t just close it) so FrameFlow can pick up the result, and make sure Camera Raw is set to Save in Same Location (see Editing). If you saved elsewhere, use Pull Edit (⌘⇧I).
A teammate can’t join — it says versions don’t match.
That’s by design: everyone in a session runs the same FrameFlow version. The joining Mac is shown an Update button — one click, relaunch, rejoin.
Support
How do I get help?
Questions, bugs, or feature requests are welcome:
- Email: andrew.wevers@gmail.com
- Web: www.andrewwevers.com
When reporting a problem, it helps to include your macOS version, FrameFlow version (Preferences → About), and what you were doing when it happened. Reveal Log Files (Preferences → About) shows the readable log plus a sealed diagnostics file that carries the full detail for support without exposing anything on screen — attach both.